
 Tweet
Tweet
PD Gough, artists Harvey
-
-
Dug the mk3 from its slumber under the car cover and changed the brake fluid as it’s been just over four years since it was last done, shame on me.

Bit of a disaster as my Eezibleed decided the reservoir cap seal would wee fluid while I was bleeding the rear brakes. The fluid reacted with the nice satin black rattle can finish on the servo so my work on the mk3 was slightly extended.


All sorted now with a fresh lick of paint for the servo and brakes bled using a different reservoir cap seal.


Next was to sort the surface rust I spotted in February on the front of the front nearside strut. Cleaned it up and popped some Kurust on as it wasn’t at all bad. It went black as it should so I knew it had done the job intended.

The following day I used a cotton bud and touched up the area to make it look a little neater. You can’t see it with the bits and pieces in the way around that area but at least I know it’s now sorted.

Last but not least was to investigate the slow front passenger electric window which turned out to need fresh lithium grease on the mechanism, a slight realignment of the door inner skin slider and a smear of silicon grease on the top of the window seal which had worn through the nice felt finish down to rubber.

Rather enjoyed my (frustrating brake bleeding) time working on the mk3. It’s only covered 271 miles since this time last year so let’s just hope we get to drive it again soon.
Comment
-
Nice to see what you're doing with "Doug the MK3" LOL well that's how I read it he he he ......
Hope you and M'anda are keeping well and safe?
L.Comment
-
We don't name our cars unless they're misbehaving then they get called all sorts!
We're doing fine thanks Laurie, plodding through these strange times patiently waiting so we can enjoy the cars again
Comment
-
Having been warned about possible rust gremlins I double checked the front underneath of the nearside strut after removing the arch liner as I had previously only peeled it back a little to check with a torch. I’m pleased to say all is solid as a rock under there which is what I expected but it’s pleasing to have it confirmed after a good old prod and poke, thanks for the warning guys.

Comment
-
Rewind to November 2015 in this diary and you’ll have noted I started a project but never finished it which isn’t at all like me. I’ll recap to save you trawling through my old posts.
I have a few spare Astra mk2 LCD dashes and decided I’d make a properly converted hybrid version that fits and plugs straight into the mk3.
I started with adapting the odometer so it could have the trip reset in the centre as the mk2 is offset. This was easy as a longer bar was added from a donor mk3 dash with plunger moved accordingly.

I then stripped both dashes to be left with this.

The rear was cut from both so they could overlay.


That’s as far as I got in 2015 and it’s just been sat on my shelf collecting dust until a couple of weeks ago, this is when the fun stuff began so if you’re still with me read on.
The dash fronts had previously been cut like this to give maximum visibility of the full LCD panels.

Next was to glue it all together to make a single unit.

The front panel was then masked to protect the bits I didn’t want painting and primed.


The final coat painted using the only matt black I had black VHT exhaust paint. Original mk3 front for comparison, it looks good even if I do say so myself.

Added the LCD panels to the front facia & rear covers which look like this.

Sorting wiring so I could use the correct colours. Donated from an old Vectra B V6 main harness loom.

Comment
-
Next was to cut the rear lower warning light panels & solder upper mk2 to the lower mk3.


I made an adaptor loom so I could plug the new hybrid dash into the existing mk3 dash plugs without having to cut anything. I added two extra pins into the existing mk3 dash plugs using spare locations for the oil pressure gauge (blue/yellow) & lights on (grey/green) so the dimmer works correctly with the LCD backlight. Speedo feed (blue/red) comes from the Vectra ABS I installed when the V6 went in.

I bought an A3 size sheet of grey tinted polycarbonate so I could make my own front.

The dash front & polycarb were drilled around the edge using a 1.5mm bit with the odometer reset plunger hole drilled at an angle using a 7.5mm bit.

Here you can see the tint comparison, mk2 LCD original on the left, my grey tinted polycarb creation & stock clear mk3 on the right.

The grey tint polycarb is attached using the metal inner from garden twine & twisted to hold it in place. I did heat the polycarb in an attempt to add a curve but it only added a slight curve being enough to get the shape I wanted.

To stop dust ingress the edges were covered with insulation tape & being cut slightly oversize meant the tape isn’t seen when installed in the car.

This is the lower warning light circuit finished & taped for protection. I’ve made the whole dash so it can be fully disassembled should there be any issues with LCD panels or the rear circuit board require placement.

The original dash looked like this, dull, boring & standard.

My new hybrid creation pictured with & without flash for better clarity. I know it won’t be to everyone’s taste but the wife & I love it as it’s added that little extra uniqueness to an otherwise stockish interior. I’ve duplicated the battery & oil pressure warning lights by design so they appear as they should on both the LCD panel (top left) & mk3 lower warning light section. There’s not excuse you didn’t see them if the worse should happen that’s for sure.


Comment
-
After fitting the LCD dash I noted the oil pressure gauge wasn’t right as it should display empty until the car is started & was showing full. I traced this to the sensor which has two feeds, one for the oil pressure warning light (plug socket) and one for the oil pressure gauge (threaded stud). Both feeds should give continuity to ground when the engine isn’t running but the stud was open circuit at the sensor and thus faulty. The new replacement arrived yesterday.

Slightly different to the OE sensor but still does exactly the same job.

My 5 minute sensor swap turned into an hours job as the oil warning light feed plug wasn’t long enough & needed extending by 15mm. So out came the cutters and plug disassembly tools.

I then cut the original wire off and soldered a new longer one on using the correct wire colour blue/green & the job was done.


LCD oil pressure gauge (top) now reading correctly with the ignition on & engine not running i.e. no oil pressure.

Comment
-
Awesome work on the hybrid digi dash.... love it
Comment
-
While having a look around the mk3 I noticed the F28 gearbox fill level plug had damp around it, nothing bad but it shouldn’t be there. The plugs don’t have any sealer or washers and just done up darn tight to 50Nm. I cleaned it up using brake cleaner and even with the car unused the oil dampness came back and yet it’s not over filled. Action plan to resolve the issue, fit an M18 copper crush washer so that’s what I did and that’s resolved it. Pictured from the underside looking up, lovely and dry so I’ll class that as a win.

Comment
-
After dropping the exhaust tips off for ceramic coating earlier this year COVID struck so things got delayed a little. We initially wanted grey with a gloss lacquer finish but for whatever reason the lacquer wouldn’t take and kept going blotchy. The company I used contacted their suppliers who said they should be compatible but try as they might the tips just wouldn’t gloss up. After having a chat they applied the grey with no lacquer and sent it for me to try. It looked pants and just didn’t go with the car at all so they were sent back for a strip and recoat.


After further discussions and being sent a sample we decided to opt for a ceramic satin black. I can happily say they are finally complete and installed and at some angles actually look grey. It’s not the gloss finish we wanted but ten times better than the original stainless tips which didn’t work at all with the car.


Huge thanks to B&B Precision Engineering for their perseverance with the lacquer. It was the first time they had tried such a thing and there was no reason why it shouldn’t work and wasn’t for their lack of trying. They were very easy to deal with and bent over backwards to help.
Comment
-
Last month was project exhaust tone down for the mk3 so it was booked in with Wayne at JAC Exhausts for a wee tickle. It’s always been loud and was just too boomy, at 50mph it rattled your head/bones/soul.
Loaded up and ready for drop off at JAC Exhausts.

The plan was to squeeze in an additional silencer at the front, moving the flexie and cat forward as far as possible. The silencer would be plugged and not free flowing with a cavity at the front to force the gases through a perforated plate and thus through the wadding. The rest of the system would be left as it was as it already had a triple flow rear silencer to cut the raw noise and free flowing centre silencer. To gain as much space as possible the centre band clamp was removed and a posh V-Band clamp fitted.
This is what it now looks like with the additional front box installed.


The results are no more boomy noise but it’s retained a sporty deep exhaust note. At 50mph you no longer bleed from all your orifices and can hold a conversation in the car without having to shout at each other using megaphones. No idea if it’s lost any performance but I can’t feel it under my right foot. I’ll get it on a rolling road at some point but honestly, I’m not bother if it has as its more pleasurable while driving on the ear. It still has it’s lush V6 grumble from 2,500rpm upwards under hard acceleration which keeps me smiling from ear to ear.
Took it for a short drive for its annual MOT this week and you guessed it, a pass for another year.
 Last edited by Harvey; 01-10-2020, 08:25 AM.
Comment
-
Thought I’d give the old girl some loving as I bought replacement leather handbrake & gear gators early last year but never got round to fitting until now.
The original handbrake gator looked fine but wouldn’t have matched the replacement leather texture so changed it anyway.

The original gear gator was beginning to look terrible which would never do.

Off they came without a fight & little effort.

The replacement handbrake gator installed on the plastic frame after a touch of cutting & careful fitting as it was a little larger than the original.

I removed the staples from the original gear gator so I could reuse the plastic frame.


With careful 1.5mm drilling I was able to use steel garden twine with the plastic coating stripped to hold both replacement gators in position.


A job done well & well done, pat on the back for me & a happy wife so a win win all round.
 Last edited by Harvey; 20-01-2021, 05:51 PM.
Comment
-
Gave the mk3 a visual inspection the other month under the bonnet and noticed the l/h front Koni shocker was leaking from the top adjuster. Only a minor weep but required fixing nevertheless.

Removed both front legs and checked around the front arches with all looking good in there.


For anyone who left the first year at VBOA Market Harbour on the Monday these might bring back nightmares, I found them on the strut lower spring seats. They decided it would be a good idea to grit the road with boulders!

After enquiries a refurb for my existing pair of shocks was going to be just shy of ?200, brand new replacements were around ?240 or a completely free fix using my old spare GTE track day suspension. I opted for option C, a free fix. After stripping the mk3 suspension I found I had used Mk2 GTE 16v inserts Koni part no.86411068 Sport and my GTE kit was actually mk3 GSi Koni part no. 86101283 Sport.
Mk3 top and mk2 bottom.
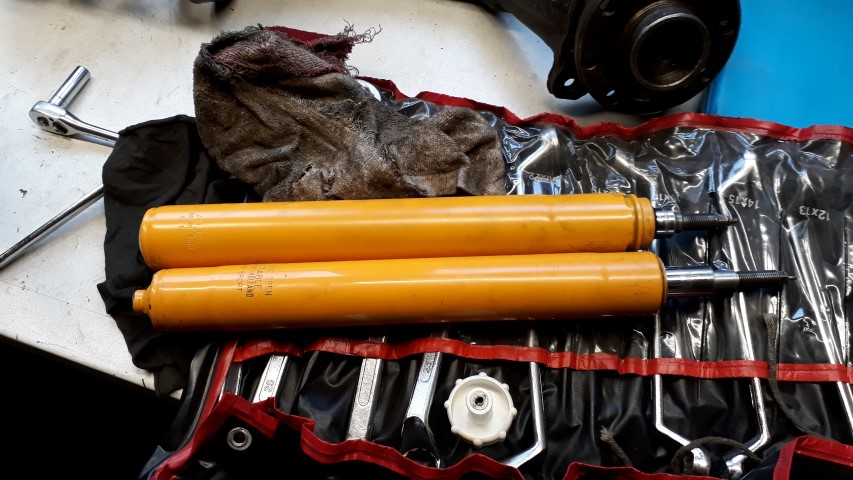
To run mk2 on the mk3 you just need to use a 5mm spacer under the nut as that’s all I had done and they have been fine until now.

Fresh mk3 inserts going in and manly stilsons to tighten the locking nut which should be 200Nm. I’ve had the locknut come loose previously on the mk3 so a blob of thread lock and good tug on the stilsons should put pay to that happening again.


Boshed the Cav mk3 V6 Eibach spring on, top gubbins and repeated for the other side. Leak resolved for no expense which is always a happy ending.

Once I’d got the struts refitted I routed the ABS and brake pad wear sensor wiring more neatly as I was never really happy how it looked previously. Much better this time.

Comment
-
what are those pebbles all about !!Comment

Comment