PDA

View Full Version : Ian T's long term GTE project


Pages : [1] 2

Ian T
29-01-2005, 03:27 PM
I'll post some content up here directly, but in the mean time, have a look at this temporary link...

http://www.abs-zero.com/Project_cars/GTE16V.htm

http://www.abs-zero.com/Project_cars/GTE_prebuy.jpg

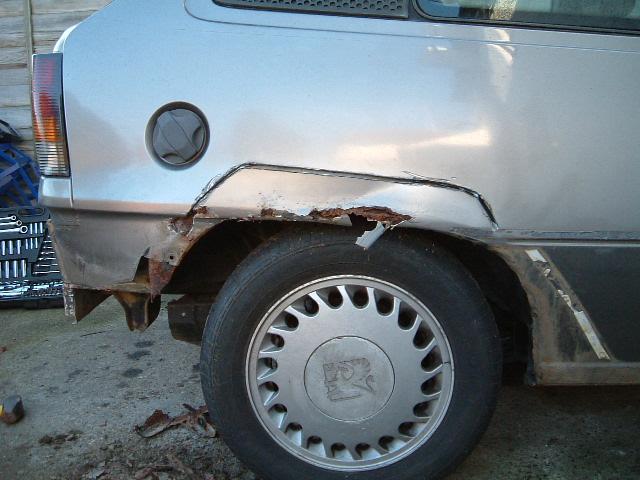
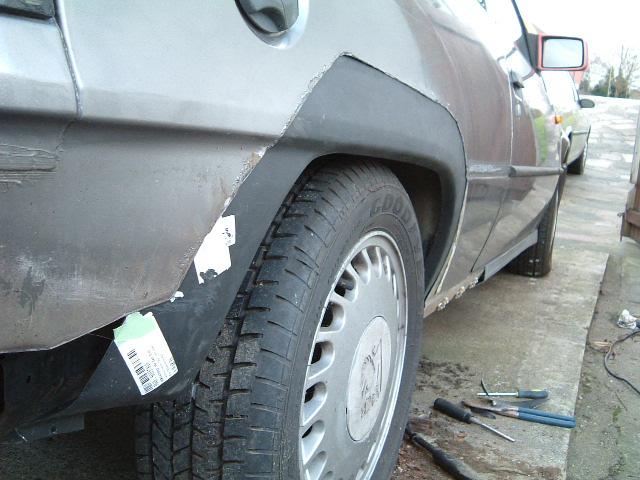
Total shed at the moment but I'm hoping I can turn it into a car again. Those that know me will know how I like a good challenge. The diary will be updated on the website as and when progress occurs.

Overall plan is to get it sorted in terms of metal replacement, then find a Vectra V6 engine to go in it.

Ian.

caul pope
29-01-2005, 03:36 PM
Oooh Vectra V6, which one you hopping to use Ian?

Good to see another astra being 'revitalised'!

Ian T
29-01-2005, 03:40 PM
Well, most of the worthwhile modifications went into the X25XE lump from the beginning, but in 1998 there were some more changes, so ideally I'll find a post 98 lump to put in. Then the usual stuff, 3.0 cams and see how it goes from there. :)

A 1996 lump would be fine also, as a good one will still purr nicely.

Ian.

Tom
29-01-2005, 07:35 PM
What have you got planned looks wise ? Mostly standard looking ?

Ian T
29-01-2005, 07:38 PM
Yeah, as standard as I can keep it really. I have to sacrifice the wheels because of the 5-stud conversion, so I'll be using my Cav Turbo rims instead, as 16" should be a good compromise between looks and handling.

I'll be interested to see if all the black plastic and rubber bits are available new though... I know people are removing them, but I want that standard look to be preserved if I can.

Ian.

_Steven_
29-01-2005, 08:02 PM
You can still get all the trim.. i recently got a complete sticker set, front GTE badge and grill, skirts, headlight washers, rubber strips, front and rear bumper trims, mirrow covers, tailgate handle and the rear 1/4 air vent things.. You cannot get the black tailgate sticket with 16v on anymore, so i've had to get the earlier one without it.

Ian T
29-01-2005, 08:09 PM
Good news...

I sprayed my old Mk2 with satin black where the strips fitted. Came out pretty well to be honest, but if the strips that fit between the doors and rear windows are still available then I might peel mine off and do a full respray, rather than masking them.

How much were the rubber side strips? Were they already cut to length and including the sticky pasd to secure them?

Ian.

_Steven_
29-01-2005, 08:18 PM
Yeh, they are sold ready to fit.. about £30 a side i think..

REMUS
29-01-2005, 09:54 PM
Are you taking about the bump strips? Are you going to keep it fairly standard on the outside or tart her up?

Tom
29-01-2005, 10:04 PM
Yeah, as standard as I can keep it really. I have to sacrifice the wheels because of the 5-stud conversion, so I'll be using my Cav Turbo rims instead, as 16" should be a good compromise between looks and handling.

I'll be interested to see if all the black plastic and rubber bits are available new though... I know people are removing them, but I want that standard look to be preserved if I can.

Ian.

Sounds good :)

Bit sleeperish then, I like that ;)

Ian T
29-01-2005, 10:44 PM
Yeh, they are sold ready to fit.. about £30 a side i think..

Excellent... I know that isn't cheap but it'll get more showroom appeal that way.

@Remus: Yeah, standard look for me, no tarting up really, although I will be updating the electronics inside, probably along with the engine, as the car the engine comes from will naturally have a standard immobiliser, central locking, alarm and other functions.

As I said, long term project!

@Tom: Slightly sleeperish, certainly nothing more than the turbo alloys to belie anything out of the ordinary from the outside. it has currently got a double-round tailpipe (2 x 3") which will have to go probably, but I'll wait and see what a V6 sounds like with it first, as it's all stainless and would otherwise last forever. Cheers for the comments. :)

Ian.

_Steven_
29-01-2005, 10:57 PM
Mines going back to standard to look at.. just got a standard 16v back box from the dealers for the exhaust people to cut the trims off when they make the exhaust..

:)

Dan Gliballs
29-01-2005, 11:23 PM
Lovely colour Ian :)

When are you going to make a start mate? I'll have to take a drive over to you when the work commences - good excuse for a drive out and would look forward to talking about Vauxhalls/life with ya ;)

Paul.

Ian T
29-01-2005, 11:36 PM
Lovely colour Ian :)

When are you going to make a start mate? I'll have to take a drive over to you when the work commences - good excuse for a drive out and would look forward to talking about Vauxhalls/life with ya ;)


LOL... I have already started, although it's far from looking progressworthy at the moment. Towards the bottom of that link are the galleries of the progress so far. Need to book some good weather (and health) and get cracking now that Christmas is out of the way.

Here's a taster...
http://abs-zero.com/Project_cars/GTE/OSR_Arch/Day1/fullsize/GTE092.jpg

With the panel tried for fit:
http://abs-zero.com/Project_cars/GTE/OSR_Arch/Day1/fullsize/GTE097.jpg

Ian.

Dan Gliballs
30-01-2005, 12:23 AM
Ahh, so you HAVE taken the plunge then :)

Will it be OK to come over sometime then?

What are your sills like BTW?

Paul.

REMUS
30-01-2005, 12:39 AM
OT: I'm going to take the front and rear bumpers off my kadett tomorrow and take some pic's, I know its going to be bad... but just how bad we shall see...

Ian T
30-01-2005, 12:52 AM
Sills look surprisingly solid to be honest! the front edge of the NS one was a little bubbly under the wing, but only where the wing had rubbed it and that soon cleaned up.

No bubbles whatsoever on the length of the sills themselves and there's evidence in other areas that the car was waxoyled in some of the cavities. Looks like the arches were treated far too late, but that's how it goes - noone thinks about rust prevention until treatment is required.

Yeah, feel free to come over sometime and have a laugh (look) and a chat. Save it for a day where it's worth opening the gates and having a look.

All the plunging so far was with a screwdriver, chisel and angle grinder... All over the Christmas break, nothing since unfortunately. Being realistic I doubt I'm going to get anywhere close to the finish you will have on yours, but all being well it'll look pretty smart for a DIY job.

Got to say it was pretty painful pushing the angle grinder through that skin... horrible noise, poor car!

Just need an old bonnet and some gash paint to practice on really. Done loads with spraycans over the years but this compressor lark is all new to me and I don't want to make a mess of it.

Ian.

Ian T
30-01-2005, 12:53 AM
OT: I'm going to take the front and rear bumpers off my kadett tomorrow and take some pic's, I know its going to be bad... but just how bad we shall see...

Looks like you'll be lucky then, as those parts are all hidden and you should be able to cut them out and weld in new panels without any ear of spoiling any paint.

Ian.

Dan Gliballs
30-01-2005, 12:55 AM
LOL - I'd rather you than me Ian. Compressor/spraygun use means another two years at college in my book.

Your sills sound exceptional for the car's year mate :)

Paul.

Ian T
30-01-2005, 01:05 AM
Yeah, I first thought they'd been replaced already.

You can see they are crusty on the inside at the back arch, but that doesn't seem to extend far along their length. After seeing the pics of yours I'd be tempted to ave a go at full sills in the future, I've always chickened out in the past and used skin sills.

Agreed about the paint / college debate. Been considering enrolling in night school for a body restoration course, which covers panel fabrication, preparation, welding and paint. Something like two sets of 40 weeks at one night (2 hrs) per week iirc.

I think I understand the principles though, many through trial and error. Experimenting with rust is also interesting, see what really works, as the claims on the products don't always match up to their performance! Only really the paint thing bothering me at the moment - first time nerves and all that! ;)

Ian.

Dan Gliballs
30-01-2005, 01:22 AM
With no formal training, any man would find the prospect daunting mate.

Have you had the carpets up to check the inner sills yet? Mine are in fine but the strengthening plates between the inner and outer sills were virtually rusted away - apparently these have a very important bearing on the car's rigidity and therefore handling - especially important with the powerful engine that you have planned for.

REMUS
30-01-2005, 01:58 AM
Looks like you'll be lucky then, as those parts are all hidden and you should be able to cut them out and weld in new panels without any ear of spoiling any paint.

Ian.

I wish! both pair's of front & rear archs need replaceing :(

Ian T
30-01-2005, 12:30 PM
With no formal training, any man would find the prospect daunting mate.

Have you had the carpets up to check the inner sills yet? Mine are in fine but the strengthening plates between the inner and outer sills were virtually rusted away - apparently these have a very important bearing on the car's rigidity and therefore handling - especially important with the powerful engine that you have planned for.

Good point, I only really looked at the drivers side so far, but I will do a full interior strip soon to get it out of the way before painting anything. I don't expect any horror stories though, as the sills seem to be decent and there's no hint of nastiness (on my external inspection) from the outside. I know the strips you mean, my drivers side one is a little scabby at the bottom edge so I'll give it a bit more of a fettle up before welding the skin onto it.

Only iffy bit left IMO is the passemger footwell at the front where it rises up to the bulkhead, looks like it's grazed something (kerb?) and there's a bit of a graunch mark and dent where the seams come together. Bound to be rusty under there so that will need checking properly.

I spotted that Hadrian do the back lower panel that goes behind the arch at each side. Saw it in your pics and thought that will save me trying to fabricate something nasty myself. Just trying to get a second reply from Hadrian now to get the local distributor's details, as the parts themselves are only £8.

Normally get my panels from SEL-Imperial, who give me free shipping and about 50% off their catalogue prices. They have a smaller range though, so it's not quite that easy.

Daunted and determined I am. Determined to at least try and make use of the hill of power tools I keep buying. Just hoping I can tune into the bigger spray pattern from a gun.

OK... not raining today, might have a prod outside and see what I need to order from Hadrian. Settling on the inner arch repair panels and lower-rear sections at the moment.

Did they get all the rust on yours down to the bare metal, inside and out before putting that red lead stuff on? Any clues what they treated it with? my normal route is to attack it with the grinder, then sandpaper until the loose stuff is gone. After that, a chemical attack of Jenolite (rust dissolver) and toothbrush over a few days normally gets to the bottom of the pitting, before I use Kurust to seal it.

Might go online and order a sandblasting kit, tho my compressor won't be able to keep up with that as it's only a 2hp one lol. Always wanted to try sandblasting, maybe now's my chance?

Ian.

Ian T
30-01-2005, 12:31 PM
I wish! both pair's of front & rear archs need replaceing :(


Weeeeeeellll... watch and see what mine turns out like then. If you like it you'll know what to do to sort yours out for yourself.

Ian.

Dan Gliballs
30-01-2005, 01:14 PM
Good point, I only really looked at the drivers side so far, but I will do a full interior strip soon to get it out of the way before painting anything. I don't expect any horror stories though, as the sills seem to be decent and there's no hint of nastiness (on my external inspection) from the outside. I know the strips you mean, my drivers side one is a little scabby at the bottom edge so I'll give it a bit more of a fettle up before welding the skin onto it.

Only iffy bit left IMO is the passemger footwell at the front where it rises up to the bulkhead, looks like it's grazed something (kerb?) and there's a bit of a graunch mark and dent where the seams come together. Bound to be rusty under there so that will need checking properly.

I spotted that Hadrian do the back lower panel that goes behind the arch at each side. Saw it in your pics and thought that will save me trying to fabricate something nasty myself. Just trying to get a second reply from Hadrian now to get the local distributor's details, as the parts themselves are only £8.

Normally get my panels from SEL-Imperial, who give me free shipping and about 50% off their catalogue prices. They have a smaller range though, so it's not quite that easy.

Daunted and determined I am. Determined to at least try and make use of the hill of power tools I keep buying. Just hoping I can tune into the bigger spray pattern from a gun.

OK... not raining today, might have a prod outside and see what I need to order from Hadrian. Settling on the inner arch repair panels and lower-rear sections at the moment.

Did they get all the rust on yours down to the bare metal, inside and out before putting that red lead stuff on? Any clues what they treated it with? my normal route is to attack it with the grinder, then sandpaper until the loose stuff is gone. After that, a chemical attack of Jenolite (rust dissolver) and toothbrush over a few days normally gets to the bottom of the pitting, before I use Kurust to seal it.

Might go online and order a sandblasting kit, tho my compressor won't be able to keep up with that as it's only a 2hp one lol. Always wanted to try sandblasting, maybe now's my chance?

Ian.

*Yeah, the hadrian panels cost next to nothing but have been an excellent fit :)

*Basically, ALL the rust was cut out with an air cutting tool - the red-oxide was painted onto the remaining good bits (eg. inner sills/inner wings etc.)

*Bigger spray pattern - I was watching Robin putting on some of the colour coats and it looked as if nothing was coming out LOL. You can see why people will dwell on one area and then get nasty runs/slips appearing.

Ian T
30-01-2005, 01:23 PM
*Yeah, the hadrian panels cost next to nothing but have been an excellent fit :)

*Basically, ALL the rust was cut out with an air cutting tool - the red-oxide was painted onto the remaining good bits (eg. inner sills/inner wings etc.)

*Bigger spray pattern - I was watching Robin putting on some of the colour coats and it looked as if nothing was coming out LOL. You can see why people will dwell on one area and then get nasty runs/slips appearing.

LOL... even more obvious with this colour as it seems to go invisible when airborne. Noticed that with the spraycans the year before last on the Cav GSI (same colour).

I expect he covered a back quarter in about 40 seconds to a minute if my guess at flow rates is about right?

Ian.

REMUS
30-01-2005, 05:21 PM
I have done arch's before but never on a mk2, my dad's m8 has a really nice spray gun rig and compressor who has said he will do my car for free :)

I might go tramp up the feild and inspect the rot in a bit...

EDIT: Well I expected it to be quite bad, and it isnt really bad but then again I havnt had a look underneath yet, it's to dark to take pic's now but I will get some up tomorrow with my cam phone.

Ian T
30-01-2005, 09:37 PM
OK... feeling a bit more human today so went outside and had a look at the non-functional central locking.

Sorted that in 10 minutes, but my irritation at the fitted alarm had to be sorted out.

Read more at http://www.abs-zero.com/Project_cars/GTE/Alarm_removal/Alarm_removal.htm

Ian.

Mark T
06-02-2005, 01:18 AM
Here's the donor: 2000(X reg)
http://www.mt006a0002.pwp.blueyonder.co.uk/IanV6Donor.JPG


Hmm, are you sure that will fit your GTE?, looks a bit big.
http://www.mt006a0002.pwp.blueyonder.co.uk/IanV6Engine.JPG

Ian T
06-02-2005, 01:22 AM
Yeah, it'll fit... ;)

Looked a bit big for the trailer too.

Ian.

Dan Gliballs
06-02-2005, 01:38 AM
'Long term project' - but you are picking up the pace :)

Ian T
06-02-2005, 02:39 AM
It's kinda like a big meccano set at the moment. I keep buying more bits but now I've got a big pile of them and none of them are on the car yet.

It's going to be fun though, still looking for a decent set of suspension, but then it's all there. Body first, MOT, then Meccano time.

Today was a real result though. Got to Mark's at 8:15 (early, for once) and then finally got to the scrappy at about 9:30, complete with trailer. I'll post up a better account of the day later (tired now) and also some of the pictures as it all came to bits.

First job was to check the engine ran, so on with the jump leads and cranked her over. Started, but there was a HORRIBLE noise coming from the PAS pump, so switched it off sharpish. Found out why - the front PAS (cooling) pipes were bent flat under the car and there was no (or vastly reduced) flow through them, so the poor pump was virtually stalled.

Removed the auxiliary drive belt and restarted the engine. Much better and running fine. Quick plug in to Tech2 confirmed no present codes, although there was a 'not present' code saying that the air mass meter had been faulty, possibly during the crash?). With the aux belt removed it was important not to run the engine any longer than necessary because it had no water pump drive.

So I've got a MSD-modified (cams only iirc) X25XE from a 2002 car with 68k miles on it. Very very excited now to see it in the GTE later this year. Some of the other bits will be up for sale, including a full set of Vectra V6 brakes, hubs, suspension, F23 gearbox with cable drive and hydraulic clutch, air con compressor, a load of air con pipes. Even got the gear selector with the gearbox, so conversion from rod-actuated gear selector to cable is easy.

Hats off to Mark T and James McBride from MIG for their help - this is another job I wasn't going to do on my own in a month of sundays. Thanks guys! :D

That's all for now, pictures tomorrow.

Ian.

Kris
06-02-2005, 04:16 AM
Have you got the whole Vecy for spares ?.

REMUS
06-02-2005, 11:52 AM
how much did that set you back ian? Its a good idea to keep a tally of the running costs so people know how much these type of projects cost for future referance.

Mark T
06-02-2005, 03:49 PM
Car was a CATB so shell couldn't leave.

The interior and wheels had already gone.

£600 for the engine and box, with front and rear suspension.

Ian T
06-02-2005, 07:30 PM
As Mark says really.

I'd consider what I got to be well worth the money to be honest. I've removed the bits I don't want today (F23 and air con stuff) and placed it on a pallet in the corner of my garage until summer. Very impressed with the engine crane, it lifted the engine / box complete with subframe clear over the (high) trailer sides, while airborne I stripped off the subframe and box with no dramas whatsoever.

Pretty much had the option of the whole car (less the shell) as the guy wasn't counting the bits I took off - he'd made his profit by then anyway.

The shell is pretty much bare now, although there is still one mint door left on it, I expect it will be crushed this week, complete with all its central locking motors and electric windows.

Scarily complicated cars though, I've got absolutely miles of loom to sort out, although I'm hoping most of it will be dead easy. I keep telling myself it will be things like the cooling system that will probably take up the time.

OK... costs so far...

GTE 16V pretty much as scrap (no tax/mot) £450
Paint materials (not used yet) £100
Panels (two front wings, plus two rear arches) £48
2002 Vectra V6 engine with MSD cams at 68k miles £600

That can be offset a bit:
F23 gearbox with all kit to fit later type cable gear selector (hydraulic clutch) £250?
Vectra V6 hubs, calipers and discs (front and rear) £150?
Almost new (2002) aircon compressor with all pipework £50-£100?

Plus some other odds and sods like engine mounts, auxiliary air injection etc. We'll probably fit the suspension to our V6 Vectra, as it is lowered and a bit stiffer. Should be good all round, the trailer should earn its keep now too.

Ian.

caul pope
06-02-2005, 10:59 PM
Sounding good mate! What sort of power/torque do think the X25XE with cams is putting out? And what you eventualy hoping for?

Ian T
06-02-2005, 11:40 PM
Sounding good mate! What sort of power/torque do think the X25XE with cams is putting out? And what you eventualy hoping for?

This is a different one. Standard they should make just under 170bhp with 170lbft. This will be more, anything it gives me over standard will be appreciated, the book figures are about 194bhp with 193lbft (262Nm).

Like this:
http://img174.exs.cx/img174/4471/image49kc.jpg

I'll be happy with that, the exhaust won't be standard (how can it be on a Mk2 V6? ;)) and the air filter will have to be different too, so some of the plastic resonance stuff will be missing.

I guess we'll see!

Ian.

Dan Gliballs
07-02-2005, 12:47 AM
I bet you'll attack the transplant BEFORE the summer Ian - you'll keep walking past the V6 lump in the garage and it will give you lustfull thoughts LOL!!

Ian T
07-02-2005, 01:41 AM
Well maybe.

BUT my garage isn't at my house so I won't see it that often. Had plenty of thoughts today when I was preparing a nice place in the corner of the garage for it. I was thinking... yeah, the GTE is a nice chort car, should be plenty of space to work in here...

Got to keep my mind on welding for a bit yet, only when that's done can I think about playing engines - I need an MOT to drive it, and I really want to have a go with the standard XE so I have a reference point for the standard car before I get all keen and modify it. As the weather gets warmer and better I'll speed up a bit - I've got home chores to do too, a new bathroom to fit for one.

I'll take a nice pic of it sat in splendour in the garage... give you lustful thoughts. ;)

Ian.

Ian T
07-02-2005, 02:03 AM
Just found the pics of it on the trailer... Simply awesome combination length!

Incidentally I hired the trailer for the day and it towed absolutely flawlessly. Very heavy all up, but the hydraulic tilting bed made loading very easy and safe.

http://www.abs-zero.com/Project_cars/GTE/InitialPics/GTE150.jpg

Ian.

Dan Gliballs
07-02-2005, 02:17 AM
Eee by gum, it could be my Astra's brother :)

Ian T
07-02-2005, 02:21 AM
Eee by gum, it could be my Astra's brother :)

LOL... maybe one day ;)

Ian.

Kris
07-02-2005, 02:29 AM
My pet hate for any dent is the one you have under the back light :p

Ian T
07-02-2005, 09:06 PM
Yep, mine too. It will be going when the arch replacement gets almost complete, as it will be sprayed at the same time. At least it's a nice small panel, could sort that in an afternoon with a can of filler and a spray can if the rest of the car was ready.

Ian.

Ian T
31-03-2005, 11:08 PM
Right. Weather has been a little better of late and I've been a bit preoccupied with an Omega Estate I was given in November. Astra is back on the priority list again.

Basically it has been waiting since I cut the OSR arch out over the Christmas holiday and the first bit was to take stock of the condition of everything.

I pulled out the repair panel that had been sat in the gap and inspected the inner arch. being honest I was ready to start welding the panels back in but couldn't just do it as there was too much pitting in the inner arch for me to be happy with it and so I started probing more heavily around other areas of the body to see what else would need to be done to get a 10-year job out of it.

Heavy and spirited screwdriver action in the rear of the sill found two areas that were too soft to leave, so I decided to bite the bullet and buy a new full sill, inner arch panel and outer lower rear corner. Got all the panels today and they look like a good fit. After reading of peoples' experiences of Hadrian Mk2 panels I decided to try them and went to a (reasonably) local stockist, Kent Car Panels.

First impressions are good, they feel sturdy and appear to match up with the car pretty well. I spent a little while tonight drilling the spot welds out of the rear corner and found a really nice way of removing seam sealer. Using a blowlamp to heat the seams I simply wire brushed off the seam sealer and exposed really lovely clean seams that will be a joy to weld to.

All looks to be on for Saturday to crack on, cut and drill out the old sill and weld the new one in. All being well I'll get the inner arch in too and then can concentrate on the outer panelling and filler / primer.

Pics will follow.

Ian.

Dan Gliballs
01-04-2005, 12:06 AM
Good luck Saturday Ian :)

I could drive over with the seat etc then if you like? (if you get that 13mm spanner out :D ).

;)

Ian T
01-04-2005, 12:21 AM
Cool, I'm up for that. :)

Do you have any sunroof bits? I'm in need of (at the very least) a rear drain tube, but would prefer a complete sunroof mechanism with all the tubes.

Ian.

Harvey
01-04-2005, 09:35 AM
Ian

I have a full sunroof with all the drain pipes if you want it for £15 and it's in mint condition. I do however live in Nottingham which is a bit of a long drive from you.

Cheers

Harvey

Sipo
01-04-2005, 09:47 AM
Ooooh, good luck for Saturday Ian! Hope all goes as planned and it isnt too much of a struggle :D

Ian T
05-04-2005, 11:59 PM
Harvey, thanks, but I have one now, courtesy of Dan Gliballs.

I've done a whole lot on this over the weekend and had to stop for a bit now while the bathroom gets ripped out and replaced. Sill, inner and outer arch, and the lower rear corner are all welded in now. :D

Have a look here for pics and info (under construction) ;)

Day 2:
http://www.abs-zero.com/Project_cars/GTE/OSR_Arch/Day2/OSR_Arch_Day2.htm

Day 3
http://www.abs-zero.com/Project_cars/GTE/OSR_Arch/Day3/OSR_Arch_Day3.htm

... And there will be more!

Ian.

_Steven_
06-04-2005, 12:14 AM
That's impressive stuff!.. There's a fair few hours worth of work there :)

Dan Gliballs
06-04-2005, 02:58 AM
Ooooooh, it's taking shape now Ian :)

great details and descriptions too mate ;)

Orange Peel
06-04-2005, 11:53 AM
Thanks for the link mate.

Nice to see WIP pics etc. Great writeup too :)

dethstar
06-04-2005, 11:59 AM
looks like i'll be needing to do this shortly. How much were the panels and what was the fit like? Was the arch repair one joined to the rear panel bit as one piece? as mine has gone through there too.

i can only hope mine comes out as good as that.

braders
06-04-2005, 07:03 PM
youve made some good progress on that one mate. keep up the good work.

Ian T
06-04-2005, 11:49 PM
There were four panels...

I suspect that if they'd all been badged Hadrian then they'd have been a better fit to each other, but...

Inner arch - quite good (Hadrian)
Full sill - Excellent (Hadrian)
Lower rear corner - Very good (Hadrian)
Outer arch skin - Good shape but didn't match the Hadrian panels (SEL Imperial)

I did try to get a panel with the lower rear corner as part of the same, but the only way I can see is to buy the rear quarter skin from Vx and use that - bigger job though!

Oddly the SEL Imperial panel felt like an excellent fit before I cut everything out, so I'm at a loss as to why it's not so clever now.

The proof will be when the filler goes in and is sanded back - then we'll find out whether the shape is right or not. No idea what I'll do if it isn't - get another shell?

When I get around to doing the nearside I might go and buy a Hadrian skin and see how that feels by comparison, and offload the SEL Imperial one. Shame SEL's range isn't fuller for the Mk2 as they give me trade and deliver for free, which I can't argue with. Had to go either into London or out to Maidstone to get Hadrian panels.

Still can't get over how solid it feels, without paint you can experiment at pulling at it and it doesn't flex or deform at all as far as I can see. Soooo glad I went for the full sill, treated properly there's no reason why that should rust again in the next 10 years. :)

Still loads to do and the Meccano set in the shed is growing by the week... Looking forward to the mechanical side now and getting it through a MOT. NOT looking forward to painting it though, I'll have to psyche myself up for that first.

Ian.

BazW
06-04-2005, 11:59 PM
good work fella, top quality welding as well

Ian T
07-04-2005, 12:05 AM
good work fella, top quality welding as well

Why thank you!

But I wouldn't describe the welding as top quality though! I'm still learning and have good and bad days. The hard bit when you're having a bad day is knowing when to quit...

I just hope I have the patience to prep it as well as I can to make the most of the new paint.

Ian.

Kris
07-04-2005, 04:19 AM
When you welded up the new arches ,do you tuck the top of them under the old arch where you cut it away and the set it and tack it ?

astrarallydriver
07-04-2005, 12:49 PM
LED washer jet'ss please (".)lol

Mark T
08-04-2005, 04:53 PM
When you welded up the new arches ,do you tuck the top of them under the old arch where you cut it away and the set it and tack it ?

Under, weld, fettle and fill

Ian T
08-04-2005, 10:18 PM
When you welded up the new arches ,do you tuck the top of them under the old arch where you cut it away and the set it and tack it ?

Yeah, the arch repair panel fits under the original. It needs to be a continuous seam of weld along the join, so tacks to hold it aligned properly, then you could either (if you're really good) run along it and seam weld the lot, or (if you're not quite so good) use a series of small spot welds that overlap creating the seam much more slowly. Continuous metal either way but I'd prefer the seam weld for strength.

Ian.

Ian T
08-05-2005, 12:16 AM
More done today...

Continued with the rear arch replacement... see the link for the pics and explanations.

http://www.abs-zero.com/Project_cars/GTE/OSR_Arch/Day4/OSR_Arch_Day4.htm

Today was grinding and filler. ;)

I've also fitted the front Konis and equal length Cavalier drive shaft conversion.

Ian.

Dan Gliballs
08-05-2005, 12:28 PM
Excellent work and excellent pictures/write-up once again Ian :)

Still think it's very brave of you to attempt all this yourself, and it goes to show just how many tedious and time consuming processes that need to be gone through before primer/colour can be even thought about. All the 'nasty' work on that side is nearly over. Hope the other side goes just as well mate.

Paul.

_Steven_
08-05-2005, 12:50 PM
Ian

You want to get yourself a long sander like the one in the pictures i've attached. It's about 18" with velco sanding strips and it makes getting
the bodyshape real easy, it's also help to get the arch lip just right.

You can get them from anywhere that stocks Hadrian panels as they
supply them.

Ian T
08-05-2005, 05:30 PM
Hey, that sanding block is just the job. I've not seen any that long before and hadn't really considered it to be honest. You have me wondering if a jumbo block of wood would do it just as well. I'm debating replacing the front lower crossmember while I'm at it, so a trip to a Hadrian stockist is in the offing, thanks for the tip. :)

I've done some more today, you can see a first guide coat of primer in the photos on the next link...

http://www.abs-zero.com/Project_cars/GTE/OSR_Arch/Day5/OSR_Arch_Day5.htm

Here's one for starters...

http://www.abs-zero.com/Project_cars/GTE/OSR_Arch/Day5/fullsize/GTE%20273.jpg

Paul - I won't be doing the other side this year, because it's not as bad and will definately go through the MOT without any hassle. I know I could bung the bumpers on and take it for a test now, but I'd rather finish this side first, even if that does include painting it.

Lots to do yet before I can think about painting it - I'm starting to think I'd have been happier paying Robin. I'll be happier to have done it all myself when it's finished, but the 'finishing' but is going to be a pain. ;)

Thanks for the comments. :)

Ian.

Dan Gliballs
08-05-2005, 07:13 PM
Always looks a million times better when the area is all one colour :) Looks very professional there mate.

So if you are only going to do the one side this year, will the V6 be going in soon then? :)

_Steven_
08-05-2005, 07:30 PM
These may help a little after reading your page, they are brand new genuine quarters.. the pics aint brilliant as i cannot get the car out of the garage at the mo.. :)

Ian T
08-05-2005, 07:56 PM
Redders - thanks, they are a great help. I'll go and compare...

Paul, V6 is waiting and the list of bits is growing in the garage. Main priority is to get it on the road so I can have a go in it, from there I'll be going for the engine swap, together with a general tidy up of the engine bay.

Mark's fitting a F20 to his Cav V6 at the moment, so I'm looking forward to seeing what the lighter flywheel really means to the engine.

Ian.

Sipo
08-05-2005, 07:58 PM
Red, please tell me your other car isnt a saxo :D

Ian T
19-06-2005, 10:45 PM
OK, well things have been quiet on the reporting front, but I've been battling away with the filler over the last couple of weeks on that pesky rear arch.

Next time I will replace the quarter complete, and hang the cost!

I've had to make a compromise in order that the line across the top of the arch lines up properly. With no filler, the arch looks too archy, so I've had to put about 5mm into the lip area to lower the lip slightly. This has done exactly what I wanted to avoid and has made the rear end of the arch lip feel thick, so anyone feeling around there will think it's a rusty arch, fillered - (which it's not).

Still, having the choice of leaving it looking archy or getting it looking more like Vauxhall intended was an easy one - if it looks diabolical I'll hate it, if it feels a bit fillery I'll live with it.

Hopefully I'll get some paint on it by the weekend after next, as I'm off work that week.

Ian.

Ian T
24-06-2005, 08:26 PM
OK, went up to the garage again this afternoon and spent another 3 hours or so playing with it.

Happy now with the shape of the arch. In fact I was able to sand out most of the filler I'd used in the arch lip and it feels better now, is straight and follows the line (I think) properly. Didn't have my camera with me but hope to have time to go back up there tomorrow and take some pictures.

I can't see what I did wrong last time, except for the fact I've taken a lot of filler out below the fuel filler cap - this was in the problemmatic place though, so perhaps that's all it was. I was thinking the panels were misaligned before welding and fearing the worst.

It still needs finishing with fine paper and water, the drying out thoroughly before the grey primer goes on. The sill has a number of forming marks in it along its length, so I'm going to put a skim of filler along the door shut line and then sand back to get it smooth. I'm thinking it probably wouldn't show really, but if a job's worth doing... ;)

We'll see if I can get it all done in time - it would be nice to have it MOT'd by the end of next week, in which case a quick visit to Retro Cars might be doable.

Ian.

Ian T
01-07-2005, 01:36 AM
More updates... I'll dig some pics out later.

I've prepped the front wing for the drivers side, so I can paint that at the same time as the quarter. Now I'm at the stage where everything has been primed and flatted back, all it needs now is a quick tickle up with the wet and dry over the two pinpricks I globbed some primer into, to remove the last of the imperfections. Hardly going to be concours when done, but I didn't want to leave anything obvious there.

The wing was a bit of a pain to fit as well. It's a pattern part, not even a Hadrian panel, and the first fit was terrible, it fouled the bonnet at the front corner and stuck out terribly at the bottom. These flaws have now been sorted, by adding a bend in at the bottom of the wing where it meets the sill rail, and by modifying the alignment plate by the headlamp.

By taking about 7mm off the alignment plate, the wing now moves across to give enough of a gap to be consistent along its length (as nearly as I can get it anyway). The top rear corner (where it's bolted to the A-pillar) fouled the top of the pillar and so I straighened the tab and re-bent it further out, so the wing now stands off by about 1.5mm, which should result in a better fit with the door.

Hopefully if the weather improves tomorrow I'll be able to finish the prep and put the colour and lacquer on, then leave it to dry for the weekend. Nothing to rush for - I won't be able to take it to any meets anyway, as the MoT was waiting for the paintwork to be completed.

I'm going to look for a passenger seat in the beige Rainbow design, it needs to have an immaculate base, but the condition of the back is irrelevant. I figure I should be able to transplant the cover onto my new drivers seat to get rid of the cigarrette burns.

Also I need to get myself off down to a scrappy that has Nexias in - what I want to know is whether the Nexia heater box is the same as the Astra one (in terms of fittings etc) as the engine I've bought for the GTE has the AC compressor still attached and it'd be pretty cool (literally) to retain it if possible. Otherwise it's just another weight saving. ;)

Ian.

Dan Gliballs
01-07-2005, 06:28 PM
I look forward to seeing the pictures Ian :)

Sipo
01-07-2005, 07:04 PM
Same here, looking forward to seeing the work paying off :)

Ian T
02-07-2005, 01:54 AM
OK guys... here are the pictures...

Rear arch replacement coming on now... http://www.abs-zero.com/Project_cars/GTE/OSR_Arch/Day6to8/OSR_Arch_Day6to8.htm

Sunroof replacement that I did in May... http://www.abs-zero.com/Project_cars/GTE/Sunroof/Sunroof_Day1.htm

Enjoy!

More as I do it, but it shouldn't be too long now before I can drive it.

Ian.

george124uk
02-07-2005, 02:04 AM
where do the front drains come out is it behind the door hinge?
or into the engine bay?

Dan Gliballs
02-07-2005, 11:11 AM
Superb work :)

By the pictures, the line you've achieved looks as good as any bodyshop job.

Repaired car bodywork always looks so much better when some colour has been applied (to make the whole panel the same consistant colour).

What state is the N/S arch in?

Ian T
04-07-2005, 01:31 AM
where do the front drains come out is it behind the door hinge?
or into the engine bay?

Front drains (sadly) are routed down the windscreen pillars and then vertically down into the sills through the A-pillars. The sad bit is that Vx never tried to make them exit the car, instead the pipe finished about 5mm above the lower line of the sill.

That'll be why they rust, then!

Ian.

Ian T
04-07-2005, 01:34 AM
Superb work :)

By the pictures, the line you've achieved looks as good as any bodyshop job.

Repaired car bodywork always looks so much better when some colour has been applied (to make the whole panel the same consistant colour).

What state is the N/S arch in?

Cheers for the comments. :)

NSR arch is as it was before, i.e. nasty. But it'll go through an MOT I think, so I can have a drive and a play before doing that, but I'll probably spray and fit the new front wing much earlier for that side, as it'll help it out no end. Near side looks like a scrapper, off side will look quite passable when done.

Agreed about the paint, it was a big battle not to just spray over it and hope it'd be OK. With the colour going on so nicely I was dying to put some lacquer on but had to wait for now.

Ian.

CraigGreen
05-07-2005, 12:58 PM
Lookin good mate, Im battling with my bodywork at the mo. Those r arches are a pain to get looking std.

Ian T
05-07-2005, 07:20 PM
Lookin good mate, Im battling with my bodywork at the mo. Those r arches are a pain to get looking std.

I hadn't appreciated before what a complicated shape they are - they really are pretty difficult, whilst on the face of it looking pretty simple. Next time I'll have to do a Nova... ;)

Ian.

Ian T
11-07-2005, 12:45 AM
Some more progress this evening...

Write-up is here:
http://www.abs-zero.com/Project_cars/GTE/OSR_Arch/Day9/OSR_Arch_Day9.htm

http://www.abs-zero.com/Project_cars/GTE/OSR_Arch/Day9/fullsize/GTE%20339.jpg

Basically primer, flatted back, colour and top coats. This side is starting to look like a car again.

Ian.

Dan Gliballs
11-07-2005, 02:16 PM
Born again Ian :)

That'll shine up nicely ;)

Ian T
11-07-2005, 05:40 PM
I just couldn't wait, so I've just been up to the garage with a bottle of T-Cut to see how it polishes up. Only done the windscreen pillar, over the top of the roof and back down the rear quarter pillar, but it looks nice. There's a slightly low patch just ahead of the arch and a line is now visible where the filler meets the metal (metal's much harder to sand than filler). It's more that I'm nit picking really, as it doesn't really look too bad, but I must've taken my eye off the ball a bit while concentrating on the rear part of the arch. Next time it will be a full quarter panel, no questions about that.

Pretty happy really, it ought to compound up reasonably well, on the narrow panels I've already polished all I've done is to flat it back a little to leave a slight orange peely texture, as that's what I like to see. It would easily flat back some more though, leaving it mirror smooth.

A couple of small corn flies got into the lacquer, but it looks like I can polish them out, rather than trying to do a Jurassic Park style preservation of them. I'm thinking I'll go back up there later and have a go at the reassembly process, fit the front wing, weld up the front crossmember where it's a bit thin and refit the front bumper etc.

Next weekend will be Meccano time and the rear suspension can be changed, possibly also with the 5-stud conversion stuff going on at the same time, we'll have to see.

Not quite born again... you've seen the other side... ;)

Ian.

Ian T
17-07-2005, 12:31 AM
OK... a large dose of thanks to Mark T who came around today and helped me swap over the suspension and brakes, including the rear beam.

Now I've got Vectra B stuff fitted, with Cav V6 struts (and the equal length drive shafts). All 5-stud which means I've now got the Cav T wheels on.

The Koni/Avo setup looks quite low at the back but probably not too low. I didn't have my camera with me today but I'll post some pics of it when I'm next at the garage.

All that really needs doing now to complete it is to remove the GTE rear calipers and fit the Vectra ones, though the hubs / discs are all sorted.

Getting it sorted now - hopefully should be ready for an MOT pretty soon...

Anyone need a 16V rear beam? I've removed the extra external antiroll bar and the handbrake hangers... Also got Cav V6 front shocks and springs going begging, also the front legs complete with calipers and some fairly worn discs. The rear brakes are currently still fitted to the beam, but can easily be removed. They are in good condition, the discs are pretty unworn but are quite pitted as the car stood outside for a while.

The original GTE wheels are now not needed, I've got about 6 of them... Two pretty mint, the rest are in need of a refurb I'd say. Most have good tyres.

Ian.

Ian T
17-07-2005, 01:28 AM
Some pictures taken on Mark's phone...

Two beams - old one (Mk2) to the left, new one (Mk3) to the right. Spot the difference... The Mk3 one has larger holes in the centres of the hub mounts, so it will accept the later type hubs with ABS connectors.

http://img323.imageshack.us/img323/2935/picture00879gh.th.jpg (http://img323.imageshack.us/my.php?image=picture00879gh.jpg)

Beam-less from both sides (fronts already done)

http://img323.imageshack.us/img323/9495/picture00886fk.th.jpg (http://img323.imageshack.us/my.php?image=picture00886fk.jpg)

http://img323.imageshack.us/img323/2434/picture00893ck.th.jpg (http://img323.imageshack.us/my.php?image=picture00893ck.jpg)

And a quick pic from the side - notice the door still needs stripping back and respraying. The colour match looks appalling, partly that might be because the door isn't original paint and is too dark, partly I think the new paint is a bit too light.

http://img323.imageshack.us/img323/1905/picture00904qe.th.jpg (http://img323.imageshack.us/my.php?image=picture00904qe.jpg)

It ought to be OK when the door gets painted, as it'll be from the same batch.

Ian.

James C
17-07-2005, 11:15 AM
is ur garage on ladycroft way mate?

i used to deliver newspapers on that road and the surroundings of ur shots is looking kinda familier

d355tgo

Ian T
17-07-2005, 11:18 AM
LOL no, it's not in Orpington. I can see what you mean tho!

Ian.

Dan Gliballs
17-07-2005, 04:24 PM
getting better all the time Ian :)

My doors are totally different colours to the sprayed rear quarters too LOL!!

Sipo
17-07-2005, 11:47 PM
Fair play Ian, it is coming along now! You are doing a lot to this car and it is starting to pay off ;) The backbox on your car looks absolutely huuge with the rear beam out of the way!

Ian T
18-07-2005, 12:05 AM
Fair play Ian, it is coming along now! You are doing a lot to this car and it is starting to pay off ;) The backbox on your car looks absolutely huuge with the rear beam out of the way!

LOL... it is huge. Not quite so bad with wheels and bumper fitted, but I think it's too big for my liking - I've got a VectraB one to fit when the engine conversion gets done.

Ian.

BazW
18-07-2005, 12:53 AM
looking good with the cav turbo rims :cool:

Ian T
18-07-2005, 01:04 AM
Yep, they do suit it. Gives a bit of an original look to it despite the change to 5-stud. I wasn't really in the market for aftermarket wheels, as I want it to stay fairly standard on the outside.

Starting to consider getting it MOTd this week, when I've sorted out some insurance perhaps.

Ian.

Dan Gliballs
18-07-2005, 01:54 PM
Yep, they do suit it. Gives a bit of an original look to it despite the change to 5-stud. I wasn't really in the market for aftermarket wheels, as I want it to stay fairly standard on the outside.

Starting to consider getting it MOTd this week, when I've sorted out some insurance perhaps.

Ian.

We'll have to do a bit of a meet up then when your out on the roads again :)

Mark T
18-07-2005, 03:36 PM
Getting a bit common thes Turbo rimmed MK2s.

May have to change mine now ;)

Ian T
18-07-2005, 09:49 PM
LOL... yours will have a smaller brother soon. ;)

Yep, a meet sounds good, but you'll have to promise not to laugh at my scrapper!

Ian.

Dan Gliballs
18-07-2005, 11:56 PM
LOL... yours will have a smaller brother soon. ;)

Yep, a meet sounds good, but you'll have to promise not to laugh at my scrapper!

No laughing here Ian, nowt but admiration for your work ;) :)

Ian T
19-07-2005, 01:04 AM
No laughing here Ian, nowt but admiration for your work ;) :)


LMAO... someone's got to appreciate it, Paul. Personally I'd say Robin knew what he was doing when he did yours, I've learned a lot and will hopefully do the next one (a) much better and (b) much quicker.

Sadly I'm away now until Friday so nothing's going to get done this week.

Ian.

Ian T
01-08-2005, 10:14 PM
I'm not about most of this week, so I plan to get it booked in for next week for MOT, but have yet to solve the insurance dilemma. Fleet policy or separate ones (3 of)?

I was pretty well set on a fleet policy until Mark T let me know I'd need an engineers report on the V6 conversion when I do it, if I went with Tradex. I don't know if Henryk at V-Tuning does these (to a recognised standard) but the insurance company suggested they normally go with AA or RAC.

New pics coming shortly.

Ian.

Ian T
30-10-2005, 09:26 PM
Hmmm...

It's been a while since the last update to this thread, so here's a summary of what's been done since.

The fuel lines have been replaced with a pair taken off another GTE, although one of those was too pitted and leaked when fitted. That got solved by cutting the corroded part off and using rubber tube around that corner. I'm considering having a go at upgrading to the Astra3 type, as they are plastic and so won't rot.

Last week I booked it in for MOT, at 9am, which it failed on three points:

Rust in the floor pan under the passenger seat front mount brace.
Brake pipe insecure (clip broken) in middle of NS run.
Brake lights inoperative.

Solved the brake lights there and then - I had knocked off the connector from the switch, but the welding looked like it was going to delay my fun.

Instead I thought 'There's no time like the present' and took it straight home, ground out around the rust and cut a new patch to size. That meant removing all the centre console and radio / heater panel stuff, then lifting the carpet, the foam insulation and finally removing the heating air ducts that lead to the rear footwells under the seat.

The patch was then welded in, and the car was all back together again by 2pm, when I took it back for the re-test. My MOT inspector was a little shocked to see it back so soon and was happy with the welding, although I don't think he entirely appreciated my (temporary) repair to the brake pipe support - I used a strip of steel plate, bent to form a P clip, then a plastic rivet over the original mounting post. It's secure and he couldn't argue the point really.

Made me smile though when he said 'Well it won't fall off this year I suppose.'

So it's MOT'd, taxed and insured for the next year, I drove over to Mark T's this weekend for a scrappy meet and surprised him by turning up in the GTE. He helped me set the tracking and it drives like a car now, rather than a boz-eyed rollerskate.

First impressions?

1. Loud - that Scorpion exhaust is too loud for me.
2. Not fast - I later discovered that it needs some stick to get seriously moving.
3. Not as rattly as I had expected - in fact the only rattle that annoyed me was the plastic shrouds round the steering column, and they're fixable.
4. The F20 box is lovely for driving round fairly gently, there's always a right gear until you get on the motorway, when they all go wrong above 70mph.
5. It's pretty quick over about 4.5k rpm - Normally I go nowhere near that sort of engine speed, so roll on the V6.
6. Did I say it was too loud?

It still looks pretty shabby, as can be seen in the meet pics from the Westerham get together. The Astra Sport boys didn't appreciate it much! :o Hopefully it'll all get a bit better when I get time to sort out some remote central locking and then de-lock the doors - after which I can spray them to match the rest of the car.

Ian.

Mark T
30-10-2005, 09:42 PM
That's not Loud ;)

Ian T
30-10-2005, 09:58 PM
No? :o

Mark T
30-10-2005, 10:00 PM
Lot of my Locals, would be taking that back for a louder one.

Ian T
30-10-2005, 10:38 PM
LMAO... now I see what you are saying.

I was driving quietly round your way though - didn't want to give you a bad reputation. ;)

Ian.

dethstar
31-10-2005, 02:08 PM
Sounded quiet when i heard it running.

Cheers for your help the other week btw.

Ian T
31-10-2005, 10:23 PM
Sounded quiet when i heard it running.

Cheers for your help the other week btw.

My pleasure. Did you get it fixed in the end? Was it a duff sensor?

When I say loud, I don't mean REALLY loud, but I don't like drawing attention to my car when driving round, keeping that in stealth mode pretty much means gentle deceleration the whole time. The V6 will be different again, but hopefully much quieter.

Ian.

Ian T
02-01-2006, 11:37 PM
OK, here's a little update.

Since October it's been legal, MOT'd and taxed. Since November I haven't even looked at it, although that's mainly because the weather has been very poo and the gritters have been earning double time recently. If we get a nice dry day I might get it out for a spin.

Looking at what got done in the last year I'm not too unhappy, a bit more staying power earlier on (while the weather was good) and it might have been finished by now. But, this year the OSR quarter panel has been sorted and sprayed, full OS sill and new OSF wing, all painted. Plus, and probably more importantly, a lot of the mechanical prep for the engine has been completed - Vectra brake upgrade all round, equal length drive shafts and lots of new bits to bring it back to decent mechanical condition.

The OS door hasn't been painted yet, as that is waiting for me to fit remote locking, so really it's time to look at the onward job list.

In no particular order:

Body related:
Fit Vectra central locking motors and alarm ECU, with interior sensors.
Fit Vectra ignition barrel (already made this up for the GTE)
De-lock both doors and prepare/paint.
Order new NSR quarter panel, NS full sill and NSR inner arch from Hadrian or Vx
Cut out existing NSR quarter, replace inner arch
Fit NSR quarter panel
Cut out NS sill and replace complete
Prepare, prime and paint whole NS up to roof gutter
Order new set of rubber side strips
Order new set of skirts and front / back end bumper trims (unless I paint the originals)
Later - Prepare and paint roof

Under bonnet remedial:
Remove XE engine and sell with loom.
Strip engine bay and clean / paint.
Drill out battery tray welds and treat reverse side of ex-rusty area (welded from other side)

New engine:
Suss out engine / body Vectra wiring looms and pare down to what's needed
Service Vectra GSi engine, replace timing belt and tensioners
Fit Vectra GSi engine
Fabricate OS engine mounting and weld into shell
Fabricate exhaust as needed
Fit F18(w) 5th gear pair to F20 gearbox

That little lot should see me busy for a while... Any plans Mark? ;)

Ian.

BazW
02-01-2006, 11:46 PM
some work there for you. what are you doing with the battery is that being relocated to the boot or just tidying up the tray?

I need to work out whats left to do mine, keeps getting longer the more bits I bust :(

Ian T
02-01-2006, 11:49 PM
Last year I welded up a couple of holes in the NSF inner arch, one of which was under the battery tray. No problem there with integrity of the job, but it meant that I couldn't get at the back of the weld to clean it up and repaint it - so it'll just go rusty again if I leave it.

Remove the bettery tray, clean it all up and replace the tray.

Ian.

Gteman
02-01-2006, 11:51 PM
Something tells me your going to be busy Ian.

What is with the Vectra locks etc are they needed to de-lock the Astra or is it for the immobiliser?

Ian T
02-01-2006, 11:59 PM
Bit of all of it really.

I want to use the Vectra key, as it's the spade type with the integral fob, so no separate remote for the locks. I got the ignition barrel with the engine, so it made sense to modify it into a Mk2 one and fit that - keep the whole key and lock number the same to match the engine.

I can change my mind later pretty easily because it's also possible to get the Mk2 key cut onto the Mk4 key type iirc. For now the Vec one will do.

I'll be using the standard immobiliser out of the Vectra, with my own security additions.

Ian.

Gteman
03-01-2006, 12:04 AM
Keep us posted Ian its good to see you back.

GazJevs84
03-01-2006, 02:50 AM
Bit of all of it really.

I want to use the Vectra key, as it's the spade type with the integral fob, so no separate remote for the locks. I got the ignition barrel with the engine, so it made sense to modify it into a Mk2 one and fit that - keep the whole key and lock number the same to match the engine.

I can change my mind later pretty easily because it's also possible to get the Mk2 key cut onto the Mk4 key type iirc. For now the Vec one will do.

I'll be using the standard immobiliser out of the Vectra, with my own security additions.

Ian.

that is very interesting so could you do that on any mk2 fit vectra deadlocks, igniton etc and use the standard vectra fob as i like the sound of that.

hope you get all your jobs completed as it sounds like it will turn out decent mate

Kris
03-01-2006, 04:00 AM
Man alive ,ive not looked at this in ages and well you have been busy .This looks like an excellent learning curve and i admire your dedication fella .In the same amount of time you have done this ive only thrown things in the direction of my mk2.

Ian T
18-03-2006, 03:18 PM
Long time since I looked at this thread.

Thanks for the comment Kris, it's time I started work again and got on with the old girl. I bought a Vectra GSI which is occupying the welding area behind our house, so I'll have to insure the GTE again and move it home so I can carry on with it.

I've been putting it all off because of the weather, which this week is very cold again, but dry...

Got to be time to move the GSi up to the garage until I find a bonnet and get cracking on the wiring up jobs on the GTE for the Vectra remote locking conversion etc, as that's in the way of the doors getting finished. It'd be really nice to have a car that's all the same colour this summer.

Westerham meet tomorrow... should I be ringing the insurance today to get it covered again?

Ian.

Ian T
24-04-2006, 12:55 AM
I'm in the mood... for V6ing...

I've spent the last few evenings looking up and tracing through all the circuit diagrams for the Vectra GSi and the GTE to work out the connections required to transfer the V6 in. Then a very long evening saw me divide the loom such that I could get rid of all the stuff the Vectra had but the GTE doesn't need.

Here's the Vectra loom - basically everything that runs down the NS of the car under the bonnet, through the bulkhead and across the dash, including the fuse box...
http://img79.imageshack.us/img79/7452/gte356small8rk.jpg

This has taken some doing, but you can see the three connectors from under the bonnet at the top of the picture. Pretty much all the stuff inside the car disappears, except for the stuff for the immobiliser and new style diagnostic connector.

The next bit of prep was to have a big tidy up at the garage, so there's room for the conversion.

The plan now is to have Thursday and Friday off, Mark T's coming round for a bit of a session and the XE will be out Thursday, any welding that needs doing with the engine out will get done Friday and then the V6 goes in Saturday all being well.

On the face of it the job doesn't look impossible and indeed some of you have already done it!

Some common sense modifications will be happening too. The EGR will be welded up and the Secondary Air Injection will be similarly sealed up, to prevent future issues with leaking manifolds etc. I'll be using one of Mark's CNC machined spacers, so the 3-part shafts can stay fitted afterwards. I'm looking forward to this.

Roll on Thursday!

Ian.

alistair j
24-04-2006, 09:00 AM
goodluck on thursday ian. out of interrest how are you sealing the secondary air injection system up. i have still to do this on mine and bit unsure how to tackle it

Ian T
24-04-2006, 09:32 AM
goodluck on thursday ian. out of interrest how are you sealing the secondary air injection system up. i have still to do this on mine and bit unsure how to tackle it

I've not decided yet. Removing all the SAI pipework, motor and relay (if I can find a suitable resistor) seems to be sensible, but I've not decided whether to weld up the exhaust manifold directly (easy) or to modify the SAI manifolds and seal them up individually (a little bit harder I expect).

Probably the latter, although welding the exhaust manifolds up directly is better as it removes some more of the clutter.

I've already spotted and used a different method of sealing up the EGR at the exhaust end, by removing the fitting and welding a plug inside it, so that's probably what will happen to this one as well.

Ian.

alistair j
24-04-2006, 11:27 AM
fair dos it sounds like a plan that, out of interrest if it helps i have used the cav manifolds, and from what i remeber as just sat here thinking about it now. but am sure they are already sealed, as they are cast to blank it of. but not dead sure on that but recon they might be, have a limited memeory of them blanking the holes when i offered up to the heads. they dont have the egr fitting either too.

tom gte and myself where itching to fit the vectra engine to a mk2 as i recon its the best looking v6 they do, got a lot of respect for the conversion espiecally the wiring envolved.

good luck dude, hope you and mark get it sorted.

James C
24-04-2006, 02:27 PM
Are you going to be working up at your lock up on Sat Ian? I'm off to sheffield late morning but would be interested to come have a look at the progress before i get on the M25.

Harvey
24-04-2006, 02:28 PM
Ian, seeing that loom reminds me of the GTE 16v wiring I had all over the place a few weeks ago. Keep us all updated with the progress with loads of pictures.

Ian T
24-04-2006, 09:31 PM
from what i remeber as just sat here thinking about it now. but am sure they are already sealed, as they are cast to blank it of.

Yep, that's right - The Cav doesn't have either SAI or EGR so you're right, neither would need blanking off. As the donor Vec sounded so sweet when we ran it up I didn't want to disturb the manifolds, so will be sticking with the standard ones. I'm not sure really about looks, I still like the Cav setup and Mark's Omega inlet is growing on me too, as he can still get at his spark plugs with the inlet fitted. Anyone with the Vec setup needs to buy a pair of hose clamp pliers, no faffing with Jubilee clips and makes removing the outer inlet plenums a doddle. I just have to hope I won't end up doing the same amount of welding you had to around the steering rack, but we'll come to that later this week.


Are you going to be working up at your lock up on Sat Ian? I'm off to sheffield late morning but would be interested to come have a look at the progress before i get on the M25.

Yep, dunno what time we'll be up there in the morning though, depends largely on what time Mark gets over, unless he wants our spare room for the night.


Ian, seeing that loom reminds me of the GTE 16v wiring I had all over the place a few weeks ago. Keep us all updated with the progress with loads of pictures.

For what it's worth I'll post up all the connections and the progress pics. Might even add to Mark T's gallery of in-progress pictures to make the next wave of conversions easier. I have to smile though, I think there was only DanDare's Astra V6 around when I bought the engine for mine, now I've been well and truly overtaken. ;)

Ian.

James C
24-04-2006, 11:52 PM
Ian - I'll drive up when I'm kinda of passing and see if you are about then.

Ian T
24-04-2006, 11:55 PM
Yep, no probs. Want some rear discs and hubs? Oh, and I found another GTE wheel centre you can have too. :)

Ian.

Dan Gliballs
26-04-2006, 10:49 AM
Just noticed this, yeah good luck tomorrow Ian :)

Though make it snappy, as you've got to help me with my dashboard remember :D

Ian T
27-04-2006, 09:09 AM
LOL...

Well today's the day. One perfectly serviceable GTE16v gets its heart plucked out. Camera's charged so hopefully I'll repepmer to use it. Results online later. :)

Ian.

alistair j
27-04-2006, 01:03 PM
Ha Good Luck Today Bud. I Fited The Manifolds The Other Night And Yes All Blanked Up. Your Rack Should Be Okay I Would Have Thought. Only Reason I Did Mine Was Because It Had Sheered Of Before.ha

As I Said Be Good To See The Progress Pics

Gteman
27-04-2006, 08:27 PM
Come on Ian get the pics up :bananajump:


Will be seeing you at Retro, going to send payment to Tony tonight if he ever stops polishing hi car and answers my PM LOL

Ian T
27-04-2006, 10:16 PM
Well it's not going back in.

We removed the standard Mk2 OS engine mount today so there's no return now, plus the engine's gone too, so we're pretty committed now to getting it to go.

Pics coming in a few minutes when I've resized and uploaded them. :)

Ian.

Ian T
27-04-2006, 10:44 PM
Well, we started at about 10am, I started her little XE heart up and drove out of the garage. Time for a couple of last pictures of the car with its standard engine.

http://img152.imageshack.us/img152/8980/gte3666jl.jpg

http://img152.imageshack.us/img152/7770/gte3686bm.jpg

Don't worry, I'll post thumbnails of the rest... click for the pic.

I removed the front bumper for improved access and the OSF wing for safekeeping - saves me respraying it after I drop something on it!

Really obvious stuff first, we removed the pipes and electrical connections between the engine and the shell, then removed the wheels and released the lower ball joints to allow the drive shafts to come out. The two part drive shaft on the OS was bolted to the engine, so its mount came away with the shaft.

With the coolant pipes disconnected, the radiator was removed and PAS pump and pipes released from the lower crossmsmber (radiator support) and the OS headlamp loom fed back round to the NS to avoid the PAS pipes.


That left the engine pretty much sat there waiting to be dropped out onto the floor.
http://img152.imageshack.us/img152/9153/gte3797bp.th.jpg (http://img152.imageshack.us/my.php?image=gte3797bp.jpg)

Taking the weight with the crane, the rear mount bolt was removed, from the shell end rather than the gearbox end and the gear shift linkage was disconnected. Mark and I removed the remaining bolts to allow the engine to be lowered.
http://img152.imageshack.us/img152/3290/gte3887ot.th.jpg (http://img152.imageshack.us/my.php?image=gte3887ot.jpg)

With the engine and box on terra firma, it made sense to cut the lower crossmember and shuffle the engine out on a mat, rather than jostling with it to split the box and lift it out upwards.

Out with the angle grinder...
http://img152.imageshack.us/img152/6294/gte3912ba.th.jpg (http://img152.imageshack.us/my.php?image=gte3912ba.jpg)

And the other side... (well, it WAS rusty anyway ;))
http://img152.imageshack.us/img152/1333/gte3923zp.th.jpg (http://img152.imageshack.us/my.php?image=gte3923zp.jpg)

More in a few minutes...

Ian.

Mark T
27-04-2006, 10:54 PM
My Day 1 Photo shoot is here:
http://82.34.52.15/temp/IanT%20V6%20conversion%20Day%201/

Grind it off I said.

It's got spot welds, I can use my spot weld remover on them.

http://82.34.52.15/temp/IanT%20V6%20conversion%20Day%201/fullsize/IanT%20V6%20Conversion%20Day%201%20013.jpg


Helllp, let me out
http://82.34.52.15/temp/IanT%20V6%20conversion%20Day%201/fullsize/IanT%20V6%20Conversion%20Day%201%20017.jpg

Ian T
27-04-2006, 11:18 PM
The front of the shell was then lifted as high as our trolley jacks would go and the engine was shuffled forward on a mat until clear of te car. Then it was promptly hooked back up to the crane and transported down the road to my friend's garage where it's waiting to be put into his Spitfire.

While I drilled the spot welds out holding te OS engine mount carrier to the box section on the inner wing, Mark busied himself with the Arc welder and began installing the new lower crossmember. Now this is a little beefy really, considering that it's only really got to support the weight of a radiator, but it's made out of 3mm angle, welded side to side into a U section - Thanks Mark! Looks like I've now got anoter jacking point that's easier to get to. ;)

Amazingly the spot welds came out pretty easily with the eBay drill bits followed by a chisel.

Here's the new radiator support crossmember going in. Mark did the welding today, mainly because he was there and can weld much more neatly than I can.
http://img152.imageshack.us/img152/4567/gte4002dv.th.jpg (http://img152.imageshack.us/my.php?image=gte4002dv.jpg)
http://img152.imageshack.us/img152/3126/gte4055fk.th.jpg (http://img152.imageshack.us/my.php?image=gte4055fk.jpg)

The idea is that we're going to replicate the arrangement Mark used on his conversion - to move the radiator forwards and downwards so that it will sit under the slam panel. As such two holes drilled into the new support beam will hold the bottom mounting lugs and we'll sort something out for the top tomorrow. Unfortunately I didn't have any larger drill bits so that's where we left it for today, but not before partially removing the sound deadening material from the OS of the bulkhead to check for splits and rust. Remarkably it seems to be both split and rust free at the moment, and as I managed to move it enough without ripping it up, it went back reasonably well and will stay.

Amusingly (it seems) I decided to retain the standard Astra cooling fan setup, i.e. single speed fan and single radiator temperature switch. Mark is of course correct - he 'did the job properly' and fitted the peoper V6 Omega twin speed fan setup so that the fan will come on gracefully at one temperature before engaging Warp 8 at a higher temperature. As I'm not going to put air conditioning into this car I took the easy option and left the setup as it is.

Tomorrow we'll be finishing the radiator fitting and stripping the V6 of its Vectra bits ready to go in, all being well it should be all mounted up and ready for plumbing tomorrow night.

I had planned to do the cambelt change on the new engine before it went in, but as the V6 has more room in the Astra bay it seems fair enough to leave it for now and concentrate on the conversion jobs - a cambelt change can be done before I use it anyway.

So it's now an Astra GTE 0V, probably worth about £20. ;)

Ian.

Ian T
27-04-2006, 11:21 PM
Helllp, let me out

LMAO

Possible alternatives were:

"I'm too old for this Siht"

"A one Ian-power engine, transversely mounted"

"I told you... I CAN limbo under here!"

Ian.

Gteman
27-04-2006, 11:52 PM
So it's now an Astra GTE 0V, probably worth about £20. ;)


I'll take it off your hands..... any chance you could deliver it to Glasgow LOL

Well at least i'll recognise Mark if he goes to Retro just need to check bald patches :bananajump:

Mark T
28-04-2006, 12:49 AM
I'll take it off your hands..... any chance you could deliver it to Glasgow LOL

Well at least i'll recognise Mark if he goes to Retro just need to check bald patches :bananajump:


LOL, I aint bald it was the ear defenders!

not got much up front I'll admit!

Ian T
28-04-2006, 12:49 AM
Well at least i'll recognise Mark if he goes to Retro just need to check bald patches :bananajump:

No chance, unless you're over 7 feet tall. ;)

Ian.

Dan Gliballs
28-04-2006, 11:14 AM
Keep it coming chaps!! :)

Ian T
28-04-2006, 09:50 PM
Bit of a slower day today (on my part) as I wanted to try to tidy up the inner wing area after all the welding was done.

Mark took all the pictures today on account of my camera remaining safely plugged into my PC all day. :(

So what got done then?

The engine came out of its storage place where it's been for 13 months or so in the corner of the garage. The alternator had seized solid so was replaced. After I minced about trying to weld up the Secondary Air Injection manifolds (instead of welding their holes up in the exhaust manifolds) Mark welded the manifolds up. I welded the bottom EGR fitting up to match my Vectra GSi and Mark welded a plug into the fitting at the EGR valve end.
http://img152.imageshack.us/img152/1206/gte4094lk.th.jpg (http://img152.imageshack.us/my.php?image=gte4094lk.jpg)

While I started converting the standard Astra wiring connector into a Vectra one, Mark removed the Vectra PAS pump mount and fitted a Cavalier item from a non-AC car. The Vectra PAS pump bolts up to it just fine, but it allowed us to use the Cav mount, which Mark has temporarily fitted some M10 studding to act as a temporary spacer for the trial fitting tomorrow.
http://img152.imageshack.us/img152/3835/gte4183da.th.jpg (http://img152.imageshack.us/my.php?image=gte4183da.jpg)

Next came the clutch and flywheel swap - the XE has a flat flywheel and the V6 has a much heavier pot type one, which is used (normally) with a F23 gearbox. using the F20 means that the pot type fly is too deep and gives the obvious opportunity to run what is effectively a lightened flywheel. The XE clutch looked almost new so that went straight back on and the standard (flat) XE flywheel bolts went into the V6.

My compressor and windy gun wasn't man enough to cope with the flywheel bolts, so Mark bolted a length of angle iron across the flywheel for me to stand on while he undid the bolts with his 1m torque wrench - no protest there and a top tip:
http://img152.imageshack.us/img152/3566/gte4070mi.th.jpg (http://img152.imageshack.us/my.php?image=gte4070mi.jpg)

The last thing that got done today was some tidying up of the inner wing area - I wasn't going to get into the bay again once the engine is fitted, so it's a now or never situation and I had to bite the bullet and delay the refitting until tomorrow. Pretty basic stuff really, all that got done was some sanding and treatment of surface rust behind the OS headlight and where the airbox used to rub the paint, plus around the new engine mount.
http://img152.imageshack.us/img152/3365/gte4208tg.th.jpg (http://img152.imageshack.us/my.php?image=gte4208tg.jpg)

More tomorrow.

Ian.

Ian T
29-04-2006, 06:20 PM
Engine's in.

A shorter day today and not without some problems but they're all overcome now and the engine's in the bay and properly mounted.

We used my large trolley jack to lift the shell really high by adding a block of wood and jacking on the back of the wishbone carrier. Axle stands were then pushed in but didn't come anywhere close. Bottom radiator support beam was unbolted and the engine slid in on a rubber mat under the middle crossmember.
http://img152.imageshack.us/img152/7458/gte4221tj.th.jpg (http://img152.imageshack.us/my.php?image=gte4221tj.jpg)

Then by lifting the engine from inside the bay it was possible to incrementally lower the shell around it and finally to remove the jack, as it was preventing the rear mount from getting anywhere near where it wanted to be.
http://img152.imageshack.us/img152/533/gte4254io.th.jpg (http://img152.imageshack.us/my.php?image=gte4254io.jpg)

With the shell on axle stands, the rear mount centre bolt was replaced and the NS gearbox mount bolted up. Problem number 1: I managed to crossthread one of the bolts, then when cleaning the threads up my weedy thread cleaner broke leaving some nice hardened steel in the hole instead. Some swearing ensued, but Mark got his hammer out and simply popped the captive threaded sleeve off into the box section, which was retrieved through the front. A new M10 bolt was welded in position, which gave a nice stud to locate the mount onto. Problem solved - nice one.

Moving over to the OS mount, we soon realised that the engine was not going to be anything like high enough on the new box section Mark welded in the day before. Here's the arrangement we were going to use, in fact it wouldn't have needed any spacers and in this picture the engine's been lowered significantly at the OS. To get it level would have meant lots of cutting...
http://img152.imageshack.us/img152/3859/gte4276sg.th.jpg (http://img152.imageshack.us/my.php?image=gte4276sg.jpg)

We had hoped to use the Cavalier mount complete, but to do so would have meant cutting about an inch or more out of the chassis rail and welding a new mount in higher up. Some puzzled looks of 'well it ought to have worked turned into a plan. The Cav mount was separated into three pieces - the PAS part stayed put on the engine and the three bolts holding it to the bracket removed. Next the doughnut was removed and holes drilled in the underside of the new box section as we had previously planned.

Some really nice 5mm (?) angle iron was cut up to make a new mount in roughly a U section, but so that it used all 3 bolt holes from the Cav mount and cleared the aux belt. After (mainly) Mark welded up the angle, holes were drilled to take M10 bolts into the alloy bracket and the M12 allen bolt through the doughnut. Four M12 steel washers were welded together onto the new mount to space it a little from the doughnut and help keep it in the right place.

Here are a couple of pics of the new mount. To say it ain't going anywhere is an understatement.
http://img152.imageshack.us/img152/711/gte4339st.th.jpg (http://img152.imageshack.us/my.php?image=gte4339st.jpg)


That might sound like 10 minutes work, but we gad a couple of visitors (Hi James and Phil - I was the one under the car... ;)) who came down to cringe at the size of the job we'd taken on.

Here's what it looks like now...
http://img152.imageshack.us/img152/1070/gte4342nh.th.jpg (http://img152.imageshack.us/my.php?image=gte4342nh.jpg)

That mass of cables on top of the gearbox is tomorrow's job... whoopieee! ;)

That still leaves quite a bit to do - I phoned Pirtek today, they can make up a new PAS pipe onto the GTE steel cooling pipe assembly, but with the Vectra pipe fitting at the engine end, so that will take away any need to reshape the cooling pipe and it ought to fit back where it came from or there abouts. Hopefully I'll get down there Tuesday morning for that, after we've tried the rest for fit in the bay.

I spent another hour or so last night double checking the wiring for the immobiliser, and now understand it a bit better I am going to try to run the whole transponder setup exactly as it is used in the Vectra and have already made up a Mk2 ignition barrel that uses the Vectra key. I also got the Car Pass through this week for the donor car, so hopefully I should be able to programme keys to it once it's all running.

The one bit I'm not too sure about yet is the routing and eventual position of the ECU. It might be possible to cut a hole in the NS of the bulkhead and mount the ECU in the passenger footwell, but I'm not yet sure.

So it's starting to take shape now. Hopefully it'll be running tomorrow, although I'd also like to get new fuel hoses made up, so that they can be routed well away from the rear exhaust manifold.

Tuesday list: Vaux for a Non-AC Aux belt, Pirtek for the PAS pipe.

Thanks to Mark for his help again, but also for remembering his camera, as my camera remained at home again... :duh:

Ian.

Ian T
29-04-2006, 07:00 PM
Pics added... :)

Ian.

Ian T
30-04-2006, 11:18 PM
What a day today...

A bit later starting and actually a big hill of work to be done.

Mark set to with the exhaust, cut the catalytic converter out of the Vectra downpipes, but kept the flange from the other end, then cut the mating flange from the Vectra GSi centre section that came from the same car and welded that to the GTE centre section. I've got to say it looks like it belongs there.
http://img152.imageshack.us/img152/6435/gte4351nt.th.jpg (http://img152.imageshack.us/my.php?image=gte4351nt.jpg)

This pic shows the exhaust better - downpipes and the original Vectra flexi joint, then a flange welded on and a short section of pipe to mate up with the existing GTE centre box section.
http://img152.imageshack.us/img152/1325/gte4376qo.th.jpg (http://img152.imageshack.us/my.php?image=gte4376qo.jpg)

I started on the wiring, under the bonnet first of all, then moved inside to sort the immobiliser and later style diagnostic socket out. One thing I really wanted to do was to use the original key from the Vectra GSi donor car and retain the transponder immobiliser exactly as it was fitted in the Vectra. After a bit of fiddling I think it will be possible to put the original Mk2 column shrouds back onto the column with the immobiliser ring fitted.

The cabling that came with the Vectra loom actually included the main battery connections, so I needed to make up the adapting parts to complete its migration from Vectra to Astra. Starting with that as the basis, that begins to define where the looms will run and so I cut off the XE engine connector from the car loom and started wiring in the Vectra connectors. All but three of the Vectra wires could be connected to various places under the bonnet, the remaining three were routed across the back of the engine bay along the top of the bulkhead and through the hole where the XE engine loom entered the car. From there they drop down ideally for connection to the immobiliser and to the fuel computer loom.

While I did this, Mark worked his ar$e off refitting the drive shafts, along with the new mount spacer, then refitting the radiator which almost perfectly couples to the engine on the OS using an Ecotec Mk3 Astra radiator hose. He cut the XE heater matrix hoses and used joiners to mate them up with the Vectra hoses and we did a temporary fit of a Mk3 Astra coolant header tank to put water in and allow a quick turn of the key.

I've been collecting immobiliser ECUs for a while now and as the engine has been in storage for a while it was no surprise when the ignition was first switched on, that the engine light started flashing - this means incorrect or no immobiliser signal. Luckily the second one I tried was the right one and I turned the key...

It almost started, there was air in the fuel system and I backed off the key as soon as it fired. Turned it again and it fired up almost fine, except that it was only running on 4 cylinders - I'd refitted the leads to the DISpack incorrectly...:duh: With them connected correctly it fired up almost magically and sounds pretty impressive - the XE flywheel gives it a very urgent pickup and certainly makes me smile. :D

Looks like I may have got one wire wrong in my list - I plugged Tech2 into the new diagnostic connector and nothing useful happened. Luckily I have retained the one under the bonnet and that worked fine. No fault codes, so everything seems to be wired correctly as far as the ECU and immobiliser is concerned.

Pics and a short video clip are courtesy of Mark again - is there ANY point in me owning a camera?!?!?! I'll catch up and take some pics of the wiring to aid the How To guide.

More tomorrow, as we're going to go back up there and sort out how the coolant header tank will fit, as well as tidying up the looms now that its proven. There might be a bit of a blow from the exhaust somewhere and there's no throttle cable or Aux belt, so the engine can't be run for more than a minute or so as the water pump isn't being driven. Still, it's coming together very nicely indeed now. Big smiles!

Ian.

Ian T
01-05-2006, 12:23 AM
Here's a short but bandwidth hungry video clip - but if downloading 6Mb files is OK for you, click away. ;)

http://www.abs-zero.com/Video/GTE24V_IANT.AVI

Gteman
01-05-2006, 12:58 AM
Love the wee smirk of success as you go to turn her off :applause:

Ian T
01-05-2006, 01:04 AM
Love the wee smirk of success as you go to turn her off :applause:

LMFAO... you didn't see the faces I pulled in the first video... when it was running on 4. ;)

Ian.

Ian T
01-05-2006, 10:37 AM
Ugh... it's raining. It can't rain, I've got work to do! Just looked at the BBC weather website and they reckon it'll have stopped raining around lunchtime.

Looks lke we'll be tidying the garage a bit so we can work around the car then.

Ian.

Ian T
01-05-2006, 09:18 PM
A fiddly day today saw the radiator come out, move across a little more and then go back in, complete with its original fan.

Hopefully Mark took some pictures of that, because I was a bit slow today with the camera. The way we had originally mounted it meant that the right hand fan motor support fouled the front manifold flange and so it wasn't possible even to get it into the right position. After moving it another 20mm across to the near side, the radiator and fan went in pretty easily and the offside hose (after being shortened slightly) moved further away from the PAS pulley.

I took the chance to take a couple of pictures of the wiring today, partly because hopefully it won't really be seen again, but also just for the record - as that's what seems to put people off doing these conversions.

So, starting at the simple end of the car, inside...

Here's the immobiliser ring, new ignition barrel and new key:
http://img152.imageshack.us/img152/1306/gte4432wt.th.jpg (http://img152.imageshack.us/my.php?image=gte4432wt.jpg)

Also the new style 16 pin diagnostic socket for use with Tech2:
http://img152.imageshack.us/img152/9886/gte4460sc.th.jpg (http://img152.imageshack.us/my.php?image=gte4460sc.jpg)

Here, for reference is the small plug that comes off the dash loom and plugs into the engine ECU loom just inside the bulkhead.
http://img152.imageshack.us/img152/3202/gte4458ql.th.jpg (http://img152.imageshack.us/my.php?image=gte4458ql.jpg)

One of my main jobs for today was to sort out the engine ECU loom - here's a pic of it in running condition, but far from finished:
http://img152.imageshack.us/img152/6290/gte4498xg.th.jpg (http://img152.imageshack.us/my.php?image=gte4498xg.jpg)

I've retained the Mk2 diagnostic connector under the bonnet:
http://img152.imageshack.us/img152/8841/gte4500yq.th.jpg (http://img152.imageshack.us/my.php?image=gte4500yq.jpg)

A larger plastic box containing the two relays was already fitted to the original Vectra loom. The fittings are the same as the smaller boxes, so the relays were transferred into one, and two maxi fuses added as prefuses. In fact only one of them is in use at the moment, so there's some room for expansion later if extra power supplies are needed.
http://img152.imageshack.us/img152/6008/gte4516sm.th.jpg (http://img152.imageshack.us/my.php?image=gte4516sm.jpg)

Here's the main engine ECU to car connector - a rectangular 24 pin locking connector that's hardwired into the engine loom. The cables that are tied up were today (all bar two) cut off to make looming up easier. The cut wires were for use with an automatic gearbox, so obviously not required in this application. The two that were saved allow me to have a try at getting traction control working later on.
http://img152.imageshack.us/img152/2504/gte4527qq.th.jpg (http://img152.imageshack.us/my.php?image=gte4527qq.jpg)

The green connector laying on top of the battery here looks very similar to the original GTE engine connector, but the pins are different. This carries the starting and charging cables as well as those from sensors aound the engine, such as engine oil level and oil pressure etc.
http://img152.imageshack.us/img152/5842/gte4532nr.th.jpg (http://img152.imageshack.us/my.php?image=gte4532nr.jpg)

And here's how it looks now. All of the cables are now loomed up fairly neatly and the ECU is bolted to the bulkhead, which overcame the pain involved in the other options - to put it in the wheel arch behind the liner, or to remove the lighting loom and try to fit it through there into the passenger side footwell. I couldn't bring myself to attempt waterproofing it within the wheelarch, so I went for Plan B. Mark suggested a really neat route for the main loom, as I was struggling to find a way of using up all of its length without it being on display.
http://img152.imageshack.us/img152/3434/gte4566bq.th.jpg (http://img152.imageshack.us/my.php?image=gte4566bq.jpg)

You will be able to see that the original mk2 coolant reservoir was retained, and Mark's idea was to route the loom behind it. Good plan! :)

Mark sorted the coolant pipes out into their now permanent configuration, using a combination of Mk2 and Vectra hoses, cut down to match their new routes. The next pic shows how 'Loom Corner' ended up.
http://img152.imageshack.us/img152/1399/gte4576mt.th.jpg (http://img152.imageshack.us/my.php?image=gte4576mt.jpg)

So, what does that leave to be done?

PAS pipes need making up to match the new route.
PAS cooling loop and steel pipes need refitting.
Auxilary drive belt needs to be fitted - can't be done until the PAS is sorted.
Coolant needs draining (will be to get at the PAS) and refilling.
Interior plastics need refitting.
Wing needs refitting after some general rustproofing of parts that were disturbed.
Refit bumper,
Replace headlamp mounts, refit lights and indicators.

After that, crack on with bodywork again I guess...

Ian.

Mark T
01-05-2006, 09:28 PM
Cambelt to do as well ;)

Ian T
01-05-2006, 10:04 PM
Yep, cambelt, replace that pulley, also a proper oil change.

I might revert thew new paper cartridge filter to the can type filter if it's a simple 'unscrew the assembly and replace with a filter' job.

Dare say the gearbox oil needs topping up too.

Ian.

James C
01-05-2006, 11:24 PM
Looks like you guys made good progess since i saw it on Sat morning. Good to see the engine revving nicely in that short vid.

I'm sure you just want to get it all done with now so you can actually have a drive!?

Good work chaps :applause:

Mark T
01-05-2006, 11:26 PM
I left some gearbox oil and PAS fluid in the shed.

Gear oil will need topping up again after the F18W5 swap

Ian T
01-05-2006, 11:33 PM
I'm sure you just want to get it all done with now so you can actually have a drive!?

Good work chaps :applause:

I think the applause should be aimed at Mark really, for a truly top effort. 5 days of working in a place that made both of us forget even the simplest of things was funny ha ha to begin with but increasingly irksome as time wore on.

It has been driven, in and out of the garage, also turned round. It's functional, but until the belts are all fitted it won't be going anywhere. I'm hoping that Mark's going to drive it up the strip at Pod for a laugh at Retro. Not my sort of thing, but it'd be interesting to watch.

Thanks for the comments! :)

Ian.

Mark T
01-05-2006, 11:39 PM
I think the applause should be aimed at Mark really, for a truly top effort. 5 days of working in a place that made both of us forget even the simplest of things was funny ha ha to begin with but increasingly irksome as time wore on.

It has been driven, in and out of the garage, also turned round. It's functional, but until the belts are all fitted it won't be going anywhere. I'm hoping that Mark's going to drive it up the strip at Pod for a laugh at Retro. Not my sort of thing, but it'd be interesting to watch.

Thanks for the comments! :)

Ian.


I was hoping for a head to head ;)

Beats Flutter.

Ian T
02-05-2006, 12:19 AM
I was hoping for a head to head ;)

Beats Flutter.

<looks for the door> I'll get me coat.

I was hoping for a half decent quarter. ;)

Ian.

Mark T
02-05-2006, 12:21 AM
Just Kurust and fill it.

You can do the 1/4 next summer.

Ian T
02-05-2006, 09:45 AM
Just Kurust and fill it.

You can do the 1/4 next summer.

LOL, yeah maybe. Doesn't really matter what happens as it'll be coming out again anyway! I dare say I can do a filler job that'll last a couple of years pretty quickly... goes against what I did on the other side though, although that was far worse.

We'll see.

Todays job is to go and get the PAS hoses made up and see if that little lot can be made to work, fit the aux belt and see if it charges.

Ian.


###EDIT### BTW the 'half decent quarter' was referring to its time up the strip. ;)

James C
02-05-2006, 10:33 AM
I'll take one for the team and drag you in the GL to make you feel good if you like ian

Ian T
02-05-2006, 10:35 AM
LOL that's very kind. I was referring more to my own likely performance than the car's though... ;)

Ian.

James C
02-05-2006, 10:54 AM
I've never had a go before either - so with a more powerfull car you margin for error will be more flexible than mine.

I just want to have a few goes for the sheer fun of it though more than anything else

Dan Gliballs
02-05-2006, 11:37 AM
Video footage of it on the move please chaps :D

Great work BTW :cool:

Ian T
02-05-2006, 02:41 PM
Video footage of it on the move please chaps :D

Great work BTW :cool:

Yeah, that might be possible later today but it's still uninsured at the moment and so I can't actually do anything more than 5mph on the drive LOL.

Got the PAS stuff made today, I'll explain it all with pictures later on, as I'm off to fit it now.

Ian.

Ian T
02-05-2006, 09:58 PM
A bits and pieces day today, partly because I was on my own.

Got to Vauxhall nice and early and bought replacement headlamp bush mounts, did a deal on a second hand Vectra GSi alloy and then got myself over to Pirtek in Thurrock for the PAS pipes.

Got to say they were brilliant - their Erith branch had said on the phone that they did PAS pipes, no problem, bring them down and we'll do them while you wait. Decided to go to Thurrock instead as it's a simpler drive. Walked in and saw the look of 'we aren't going to fix that' on the face of the guy behind the counter. After a bit of umming and ahhing they hatched a cunning plan, which involved stripping the Vectra banjo fitting out of the original hose and then cutting the steel cooling loop before brazing one of their fittings onto it and making up a flexible pipe.

Something to remember is that PAS pipes have a flow restrictor in the section next to the pump on the high pressure side. They managed to retain it by crimping on a sleeve on the outside - it's function is to prevent kickback in the steering wheel at full lock.

For what they did, and bearing in mind they have access to lots of tools I don't, I was happy to part with my &#163;60 for the new pipe and the work they did getting it together.

Although I got my measurements sliiiightly wrong (got 800mm, needed about 780mm) the pipe fits up pretty well and the cooling loop sits pretty much as it would have done as standard, in front of the radiator.

I had the camera so pics will be up shortly. :)

Ian.

Mark T
02-05-2006, 10:56 PM
Mine kicks back at full lock, but it used to with the XE in.

Dan Gliballs
09-05-2006, 11:00 AM
Any further developments? :)

Ian T
11-05-2006, 10:25 PM
OK, not really, I've been at work.

Tomorrow I have the day off and will go up and change a bent cam sprocket (damaged as the shell was lifted off the engine at the scrap yard). That gives me the ideal opportunity to have the back cam cover off and look inside, but more importantly to fit a new tensioner / roller set and belt.

I'll check the PAS carefully and if all's well put the proper coolant in - it's got a very dilute solution in it at the moment to make it practical to move around with the engine running.

Then I guess I need to paint the NSF wing that is waiting to go on and start on the rest.

Ian.

Mark T
12-05-2006, 12:01 AM
you don't need the cam cover off.

Just uncrack the sproacket bolt with the belt on.

That's how I removed your spare one.

Even easier with the locking wedge in place.

Ian T
12-05-2006, 02:00 AM
OK... didn't want to risk mullering your locking kit. :)

Ian.

Ian T
12-05-2006, 07:11 PM
Ok, some more bits done.

Cambelt, tensioners and sprocket have been swapped now.

Cam 4 (front exhaust) was out by 1 tooth, although the belt was fine. Might even have been changed fairly recently because the bearings in the tensioner and rollers were still reasonably stiff and new feeling.

The bent sprocket is actually quite horrendously bent - it looked bad through the damage hole in the cambelt cover, but is worse when seen off the car. New cambelt cover is on now and I've begun putting bits back onto the front end.

I bought a pair of new headlamp bushings (part 90181010) - the white plastic bits that the headlamp mounting lugs push into, so the drivers side headlamp now fits more securely. Nearside headlamp and indicator are now refitted.

The headlamp mounting frame needed some modification to clear the end of the radiator fan switch, which now protrudes through the front panel into its hole. I trimmed some of the strengthening strip that bridged the right angle to the mounting lug, fits fine now.

I also started calling round for 'GTE V6' insurance quotes. Best so far seems to be Adrian Flux at &#163;335 fully comprehensive. I'll need to move the Vectra GSi onto them too, which will be an extra &#163;425, but less overall than I was expecting.

Ian.

GazJevs84
12-05-2006, 07:23 PM
nice one bud keep up the good work i am looking forward to seeing this one finished

Ian T
12-05-2006, 07:27 PM
nice one bud keep up the good work i am looking forward to seeing this one finished

LOL... I've a feeling this one will never be finished, but hopefully will be something like tidy later this year.

Thanks for the comments. :)

Ian.

Dan Gliballs
12-05-2006, 10:19 PM
Ok, some more bits done.

Cambelt, tensioners and sprocket have been swapped now.

Cam 4 (front exhaust) was out by 1 tooth, although the belt was fine. Might even have been changed fairly recently because the bearings in the tensioner and rollers were still reasonably stiff and new feeling.

The bent sprocket is actually quite horrendously bent - it looked bad through the damage hole in the cambelt cover, but is worse when seen off the car. New cambelt cover is on now and I've begun putting bits back onto the front end.

I bought a pair of new headlamp bushings (part 90181010) - the white plastic bits that the headlamp mounting lugs push into, so the drivers side headlamp now fits more securely. Nearside headlamp and indicator are now refitted.

The headlamp mounting frame needed some modification to clear the end of the radiator fan switch, which now protrudes through the front panel into its hole. I trimmed some of the strengthening strip that bridged the right angle to the mounting lug, fits fine now.

I also started calling round for 'GTE V6' insurance quotes. Best so far seems to be Adrian Flux at £335 fully comprehensive. I'll need to move the Vectra GSi onto them too, which will be an extra £425, but less overall than I was expecting.

Ian.

Good stuff :cool:

Have you tried Greenlight? :)

GazJevs84
12-05-2006, 10:30 PM
LOL... I've a feeling this one will never be finished, but hopefully will be something like tidy later this year.

Ian.

lmao i am sure you will finish it mate i have just read the whole thread again and you have done some excellent work to that car i just hope one day i can produce something like it

just a quick question i like the idea of having a vectra key and ignition setup but i want a c20let engine in my next project so was wondering if there is any way of having the vectra key fob setup but without having the vectra engine probably a very silly question lol but you won't fingd out without asking

cheers gaz

Ian T
14-05-2006, 10:13 AM
Gaz,

Thanks the the kind words, it's simple to fit the Vectra barrel. Transferring the immobiliser transponder from the Cavalier key into the Vectra key is simple too.

Paul, yep, tried Greenlight, they gave a good starter for 10, only &#163;50 more expensive on the GTE, GSI slightly cheaper, but they weren't interested in insuring the Omega Estate as it was old and standard. Any more reputable companies that like insuring silly cars?


Went to the scrappy yesterday and bought some more bits for the Mk2. They'd got a pair of Cabbies in, one of which had a really nice NSF wing. Mark T was with me and said it was Silk Violet but in the dark last night I thought it looked a fairly good match to the new paint on my car. Bound not to be in daylight.

That means I will sell the pattern wing before it's even been fitted or painted, but I'm sure someone will want / need it.

Also picked up an OS headlamp frame and some headlamp retaining bolts, as we used two of mine to retain the Vectra ECU against the bulkhead. ;)

I've just investigated the Vectra bootlid lock barrel and it doesn't look like that will be easy to modify to fit the Mk2, which is a shame really as I was really hoping to get the whole car working from the Vectra key. :(

Ian.

Dan Gliballs
16-05-2006, 12:25 PM
but they weren't interested in insuring the Omega Estate as it was old and standard. Any more reputable companies that like insuring silly cars?

Yeah, I've had that before.

Just stuck an induction kit on the Vectra to make the insurance way less LOL!!!

Ian T
16-05-2006, 08:49 PM
LOL

Thing is, reading their logic I can agree with it. Probably a lot more comes across over the phone when you're talking to them than you might expect.

Ian.

Ian T
25-05-2006, 11:13 PM
Oh well, you can't win them all.

Got out of work early today and got myself down to the garage to have a play with the GTE. Some jobs needed finishing following the engine going in, plus I wanted to get it roadworthy.

Unbolted the new lower radiator support beam and removed it, cleaned it up and painted it with black Hammerite, also did the same to the lower parts of the front chassis where it bolts up, so it's all protected now from the elements, plus looks tidier as well.

Next I drained the coolant (mainly water) out and replaced it with new Vauxhall longlife antifreeze mix, checked the oil and water, ran it up to temperature and let it cool down while I messed about with other things, tidying up, refitting the lights and bumper.

Then the moment of truth.

Started it up and took it out for a spin. Big grins. Maybe a little noisy but bags of power compared to anything I'm used to driving. Engine is extremely sweet and very smooth. As the rev counter is currently reading codswallop, I just drove a mile or two for fun and got to the limiter twice, the revs are pretty well disguised by how smooth it is compared to te XE.

Brought it back - after all this was only a proving run - and parked up. Foot on the clutch and straightened the steering. I was listening for the PAS pump because I know it has some issues, but as I turned the wheel, I felt the clutch pedal rise up a bit.

Looks like I'm going to have to eat my over enthusiastic words of confidence in the bulkhead now. Rotating the wheel with one foot down on the clutch and the other down on the brake, you can feel one rise up and the other go down slightly, this reverses when the wheel is turned the other way.

So I have the dreaded bulkhead issue now too.

I've booked tomorrow off, planning to prep and spray the NSF wing and wire up the central locking so I can de-lock the front doors and start getting them prepped for paint. looks like I'm going to be taking it to bits again first. :(


Trying to be positive about it though - at least I had a quick play before I found this issue, and I know I've gone too far with this one to sack it now.

Might not be too bad, but it's only going to get worse and I'm taking no chances!

Ian.

James C
25-05-2006, 11:56 PM
Thats a shame - do you think that the bulkhead has been weakend by the extra weight and torque?

Seeing as you still have bits to do it seems like the best plan to sort it all out sooner rather than later.

Glad you got to test the fruits of your labours

Ian T
26-05-2006, 12:00 AM
Thats a shame - do you think that the bulkhead has been weakend by the extra weight and torque?

Seeing as you still have bits to do it seems like the best plan to sort it all out sooner rather than later.

Glad you got to test the fruits of your labours

No, must have already been bad - I thought I'd checked it well enough, but obviously hadn't.

Haven't driven it far enough yet to break it!

Ian.

Tony25
26-05-2006, 10:04 AM
Before you rip the engine out, remove all the carpets and sound proofing and look for rot on the inside. As mine did the same, but once I had the engine out I found the bulk head to be ok, it was just flexing as they do. Found that a strut brace helped lots.

Ian T
26-05-2006, 10:52 AM
Will do Tony, although now I've noticed it, I can't believe it's possible that this is normal. I know the human body can sense tiny movements but this seemed more than small and there was a defined click at one point when rocking the wheel, that could be felt in the pedals.

Going down to the garage this morning to investigate further, will report back later. :)

Ian.

Harvey
26-05-2006, 11:02 AM
I've had my firewall, as they call it in the States, strengthened with some extra box sectioning.
http://img.photobucket.com/albums/v214/harvey.emsley/GTE%2016v/body%20shop/PC210007Medium.jpg

Dan Gliballs
26-05-2006, 11:07 AM
Bit of good and bad news then Ian :(

You should've video'd your wee blast down the road :)

Ian T
26-05-2006, 11:37 AM
Harvey, I saw that pic somewhere before, has given me some ideas - am I correct in thinking that it's only ever the driver side rack mount that fails?

I'm just trying to work out whether there will be enough space behind the V6 to get in, remove the rack and strip out the sound deadening for a welding session. It'll be a bit of a pain to have to remove the engine again.

Assuming the brake master cylinder has to come out and the servo, pedal box has to come off the inside, it looks like the dash will have to come out today.

Paul, Sorry, there was no space for a camera in the car along with my big grin. ;) I'll have to buy one of those headrest mounts, as there's no way I'd be able to hold the camera when going for it.

Ian.

Dan Gliballs
26-05-2006, 12:53 PM
Paul, Sorry, there was no space for a camera in the car along with my big grin. ;) I'll have to buy one of those headrest mounts, as there's no way I'd be able to hold the camera when going for it.

Ian.

I just jam mine in the gap between the seat and headrest,.......works a treat ;)

Ian T
26-05-2006, 01:02 PM
I just jam mine in the gap between the seat and headrest,.......works a treat ;)

Sounds painful... ;)

Ian.

Harvey
26-05-2006, 02:04 PM
You are correct it's the o/s (drivers side) rack mount that fails. To get to it properly you will need to remove the brake server and rip all the crappy sound deadening out which is just a big sponge and holds water. Here a pic from the drivers foot well before repair
http://img.photobucket.com/albums/v214/harvey.emsley/GTE%2016v/Bare%20shell/PA090012Medium.jpg
and after
http://img.photobucket.com/albums/v214/harvey.emsley/GTE%2016v/body%20shop/PC210010Medium.jpg
so check under your carpet as well.

Ian T
26-05-2006, 06:46 PM
Thanks Harvey, I checked your project page and found those on there.

Dash is now out and there's spaghetti all over the front of the car now.

I've upset the local mouse population too, as I've found its store of food inside the dash. All cleaned out now, and a trap left in the boot for the next feeding time.

Removed some of the sound deadening from the inside of te bulkhead and it doesn't look as bad as that at the moment, can't see anything untoward at the bottom of the pedal box, but I can see some rusty marks at the top right hand corner of the bulkhead / pedal box, so it looks like that's coming out tomorrow. I dare say it'll be worse underneath.

I like your reinforcement section, I'm tinking I could do something similar with a length of mild steel angle cut to fit the gap and welded in to give a triangular section where you have the box. More suited to my panelling skills I think. ;)

I'm hoping the engine doesn't have to come out to do a proper job - there's ironically a little more room behind the V6 than there was with the XE, so if I'm lucky there'll be enough.

Guess we'll see tomorrow.

If I can I'd really like to preserve the sound deadening stuff everywhere - I want to hear the best bits of the V6, not stuff like cam and valve noise, alternator and belt noise. I figure that if it's properly cleaned out and protected it ought to be OK again for a while.

Ian.

Ian T
28-05-2006, 10:42 PM
Cool.

Tony's kinda right. Fairly careful investigation revealed that either Mark T's 1997 shell is equally knackered, or mine's fine for a Mk2.

Mark came round today and we did find a small crack at the corner of the bulkhead where it meets the inner wing at the top. Only about 10mm long, but that was enough to let water in and so I welded it up. Some of the welding was neat (that you'd see from under the bonnet) and some wasn't so neat (from the inside) but it's safe to say that crack will have to start again somewhere else now as it's probably the strongest part of the car now. ;)

Before (outside):
http://img521.imageshack.us/img521/790/image00010small1gq.jpg

Before (inside):
http://img521.imageshack.us/img521/5177/image00011small1ei.jpg

Forgot to take a pic before the sound deadening stuff went back on...
http://img521.imageshack.us/img521/2371/image00012small2zn.jpg

Took the opportunity to stick a couple of seam welds in around that area, but not sufficient to warrant further mention.

Looks like Mk2s do flex quite a bit after all. Mine's now pretty much the same as Mark's and his definately isn't rusty!

Cheers Mark (again) for helping out, and for the second opinions / peer review.


So, out for a drive again... seems fine and still pulls like a train.

Brought it home and have wired up the Vectra central locking ECU instead of the standard Kiekert one. I can now proceed with removing the door locks and welding their holes up, then painting the doors. That should see all of the drivers side the same colour soon, which would be nice. :)

Have I got time (at my work rates) to get the near side arch cut out and replaced in time for Retro? Surely I've got to have a go...

Ian.

Ian T
28-05-2006, 11:05 PM
Oh, look what arrived this week...

http://img521.imageshack.us/img521/2633/gtesmall9du.jpg

It's in the pile to get cut next time my better half or I go down the high street...

So they'll fit the Vectra remotes and look the part, hopefully.

Ian.

Gteman
28-05-2006, 11:25 PM
Glad to hear the bulkhead wasn't as bad as you feared. I had a moment of fear myself until I checked after reading about it on here.

I like the central locking idea, probably a project for later. Getting the car on the road is my first target.

Ian T
28-05-2006, 11:37 PM
The central locking bit is dead easy. If you don't need an alarm and you get the right Vectra module it'll only need 5 wires, plus an extra motor fitted in the drivers door.

Really easy.

If you get the car pass from the car the module comes from you can programme new remotes as well, but you have to connect an extra wire to the diagnostic socket.

Ian.

Gteman
29-05-2006, 12:05 AM
What am i looking for then ?

My m8 is breaking a 96 1.8 Vectra

Ian T
29-05-2006, 01:16 AM
What am i looking for then ?

My m8 is breaking a 96 1.8 Vectra

Behind the drivers side kick panel, there's an ECU with two connectors plugged in. Get that, plus a bit of loom and the remote controls.

Wire the ECU into the GTE as follows:

Black/Yellow to same
Black/red to same
Thick red to fuse 19 output
Thin red to Fuse 20 output
Thick brown (with ring terminal) to the GTE dashboard bracket screw.
There are several brown/white leads, one of them is the diagnostics line for use with Tech2, but if you haven't got access to one you can leave it disconnected. If he has it, make sure you get the car pass (credit card sized info document) with the 'security code' on it for the immobiliser / alarm / central locking etc.

If the car you harvest it from has an alarm there will be a lot more wiring, I'll be working that out shortly.

Ian.

Gteman
29-05-2006, 01:24 AM
The car used to be mine and I pretty sure I've got the car pass and spare key in the house.
The car does have an alarm are you hoping to fit that aswell or just unpick it and remove from the rest ?

Ian T
29-05-2006, 01:26 AM
I'm fitting the lot. :)

Ian.

Gteman
29-05-2006, 01:45 AM
Very interesting.

I wonder how an insurance company would look at it.

Ian T
29-05-2006, 02:00 AM
Adrian Flux only wanted an immobiliser. I asked if the Vectra setup that came with the engine was acceptable and they said it is, and to send photographic proof it was installed. Obviously the engine won't work without it, so that's all good.

The alarm might be a different story - I'm fitting it for convenience and for the modern 'integrated with the key' qualities. All it needs to do is make a lot of noise if the car is disturbed, there are plenty of inputs I can use for extra sensors, plus I can Tech2 new remotes on and off as needed.

As you'll know, the standard Vectra setup is Thatcham approved, but insurance companies normally want a certificate of inspection / fitting to accept it.

Ian.

Ian T
05-06-2006, 12:49 AM
Went to the scrappy this weekend and got some more bits for the Mk2.

A set of plastic fuel lines from a pair of Cabriolets they had there, plus a pair of bonnet hinges (I suspect mine are bent, we'll see.) and a pair of Cavalier passenger door central locking motors, with loom.

I was a bit concerned about the fuel lines as they were off a 1.6 (non injected) engine with a mechanical fuel pump. that means they aren't designed for fuel injection pressure use, but I checked them against some Mk3 Astras and they appeared to be the same. I'll give them a go and report back. The Mk3 ones would perhaps have been preferable in some ways but they would have been more difficult to fit on account of them running slightly differently around the front, into the bay.

Hopefully I should be able to get that little lot fitted this week.

Also ordered some panels to sort the near side out, all from Hadrian.

NSR quarter was &#163;64.20 plus vat
NSR inner arch &#163;10.80 plus vat
NS full sill &#163;13.10 plus vat

They will be in tomorrow (Monday) so hopefully I can get down to Maidstone and collect them.

Spent this weekend sorting out the front end on my Vectra GSi that I bought back in January and has been sitting on the To Do list ever since. That's sorted now and I can turn all of my attention to the GTE, get it sorted hopefully in time for Retro!

Ian.

Gteman
05-06-2006, 07:49 PM
Love to hear your report on the quality of the quarter panel Ian.

Mark T
05-06-2006, 08:17 PM
Love to hear your report on the quality of the quarter panel Ian.

It was dented!

So he's waiting for another one.

Ian T
05-06-2006, 08:59 PM
As Mark said really...

I'll call them in the morning to get them to check the replacement thoroughly before I take it away.

Going to be a bit of a squeeze into the back of the Vectra, that's for sure.

The job actually looks easier than I was expecting, as the quarter includes the rear light aperture, right back to the boot opening, I was expecting to have to cut around that and separate it all. not so!

Ian.

Ian T
06-06-2006, 11:42 PM
Love to hear your report on the quality of the quarter panel Ian.

http://img391.imageshack.us/img391/2872/gte480medium3ig.jpg

Looks OK to be honest.

Probably better than my welding will be, this one seems to be straight enough. Easy to understand why the other one was bent, these panels are pretty flexible off the car!

I hadn't noticed before that the B pillar appears to be joggled, so all I need to do is offer up, mark and cut the B Pillar to match. Of course it'll never be that easy, but you get the idea!!!

Not sure about where to do the sill though, it might be easier tocut the new full sill panel to match the quarter and use it that way.

Ian.

Gteman
07-06-2006, 01:26 AM
Good news on the panel Ian, even joggled. :applause:

You are definitely doing the right thing fitting the full panel. The time saved cataloying alone plus no seams to worry about on the inside. I am sorely tempted to refit mine with a full quarter.
I don't think the o/s is available from Hadrians anymore :grumpy:

I'm looking forward to seeing your car in all her glory at Retro.

Ian T
07-06-2006, 08:51 AM
One of the parts I ordered this time wasn't in their catalogue - I got a full sill for the NS, part 62-04-007. The OS full sill is 62-04-006 so I looked for the absence of another number and then asked them to check it.

The NSR quarter was part no 62-04-501, so maybe the OSR is 62-04-500?

Here's a link to the Hadrian online catalogue in case you don't already have it... http://hadrian.dominohosting.biz/hadrian/hcpdb01.nsf/$$ViewTemplate%20for%20MakeModel!OpenForm&RestrictToCategory=VAUXHALL%20ASTRA%20(10/84-10/91)

The old bus probably won't be looking too glorious at Retro, but I have got a week booked off on leave from work so hopefully I can get it sprayed - I really coubt it'll be polished or have the bumpers painted before then though, unless I develop a 'hand of God' somewhere along the line! ;)

Hopefully start chomping Friday night, :)

Ian.

Gteman
07-06-2006, 10:23 PM
A full on pic would be of much help Ian as I've only some fine tuning in the cataloying dept.
It has been a while since I've seen an unadulterated rear arch.

Ian T
07-06-2006, 10:49 PM
No probs... what are you after?

I would imagine you want to look along it from the level of the bottom of the rear light from the rear, then see how the lip changes as it goes round into the arch?

What else?

I've got two other pics already but can easily unwrap it again.

Ian.

Gteman
07-06-2006, 11:44 PM
Thats it you got it in one, mainly how it blends out at the front off the lip and how close the indented line comes to the arch.

thxs

Ian T
08-06-2006, 12:58 AM
Here's a pretty useful one...

http://img391.imageshack.us/img391/9664/gte4818tc.jpg

and another?

http://img391.imageshack.us/img391/795/gte4820cf.jpg

If you want any other specific ones I can take them when I unwrap it again on Friday...

Ian.

Ian T
08-06-2006, 11:35 PM
Success!!!

But not straight away. I had some fun the other night trying to fit the Cavalier door motor for the drivers door, but whilst it would fit physically, it didn't have the right throw (or reach) and so couldn't lock and unlock the door. Also it would appear that it's functionally different to the Vectra / Omega items and so after a lot of messing about I ditched that idea and went back to Plan A.

I'm a happy man - I've just fitted the Vectra / Omega deadlocks to the GTE. Happy because I spotted an easy but non-obvious mod to the lock motors to make it all doable, and happy because I didn't have to enact my threat of modifying the mechanism to support it.

I'll post details another day, but suffice to say a single press of the lock button locks the doors, a second press actuates the deadlock, just like on the Vectras etc. Also this means I can retain the door pulls if I want to (not decided yet) and they still actuate the whole locking system as they should do when not in the deadlocked state, so I can lock the doors while on the move if I choose to, then unlock them without further issues.

Next job will be to fit a motor to the passenger door and weld the lock holes up ready for spraying. :)

Ian.

Ian T
09-06-2006, 08:04 PM
OMG I've done it again...

Taken the plunge.

This time with a screwdriver and angle grinder, spot weld drill bits and all that stuff. The NSR quarter is on it's way off the car. It's no longer roadworthy on account of the sharp edges, missing parts etc.

Does anyone know if the rear window seals are still available from Vauxhall? Mine was a biatch to remove and isn't in excellent shape at the moment.

I'll post pictures later tonight, but the sill is still solid, except for the bit right at the back. The strengthening plate at the bottom corner is very rusty at the bottom where it meets the sill, so I'll have to tidy that up a bit.

About 3/4 of the inner arch is not rusty and in fact, from the inside looked almost fine. As the mouldings came off (I wasn't too gentle) the bottom of the lip came away with it and exposed a nice big hole, but this appears to be limited to the bottom of the sill.

Behind the rear bumper, the story is much the same - a mouse had previously set up home in there and filled it with festering paper and other rubbish, so the bottom had rotted through at the rear, but also similarly to the drivers side, in the wheelarch.

This is another big job, but hopefully when the panel comes off it shold get a bit easier. Hopefully.

The new rubber door and wing mouldings arrived today so the collection of bits to be put back on when it is painted is growing. Just need to stick at this and make sure it's driveable to Retro.

Ian.

Gteman
09-06-2006, 10:17 PM
Lol at the mouse nest, mine had the very same in the boot.

What a the spraying Ian are you going to do it yourself ?

Ian T
09-06-2006, 10:57 PM
Yep, it's all DIY I'm afraid, much like yours.

It looks very sorry for itself now and there's more rust than I'd hoped, so some extra plating to do tomorrow. I've got some pics for you too Graham, of the new panel, before I spoil it!

Ian.

Gteman
10-06-2006, 12:04 AM
Good man a pic straight on would be nice.

I presume your site will be updated with all the pics of the quarter panel repair ?

It seems like a lifetime ago, I must have read your site about 10 times before I tackled mine LOL

Ian T
10-06-2006, 12:32 AM
OK, time for some pics, as it's going to be worth remembering this one.

Firstly, let's remember what it looked like to begin with...
http://img391.imageshack.us/img391/2594/gte4839we.jpg
http://img391.imageshack.us/img391/6660/gte4841pa.jpg
http://img391.imageshack.us/img391/8131/gte4868hk.jpg
http://img391.imageshack.us/img391/7613/gte4877fq.jpg
http://img391.imageshack.us/img391/9291/gte4931va.jpg

And then bits started getting taken off. First the arch stone protection moulding... I couldn't get the plastic rivets out so decided to be a little less gentle with the moulding - you may have noticed it's damaged anyway. After a certain amount of bending and twisting the rusty lip parted company and left this mess.
http://img391.imageshack.us/img391/884/gte5010lu.jpg

Just a little attention from the screwdriver (MOT tester stylee):
http://img391.imageshack.us/img391/9536/gte5029jx.jpg

Next job was to get stripping anything flammable or likely to get spoilt out of the way, some more of that tomorrow, but I have started drilling out the spot welds holding the quarter to the inner skins around the back end and lower rear quarter panel.
http://img391.imageshack.us/img391/1236/gte5101sj.jpg

A mouse had set up home inside the lower rear quarter (mouse is now an ex mouse, as I got concerned he'd eat my wiring looms and leave me with a fire hazard and so I left a trap in there for a couple of days. THWAP, no more mouse.

I don't know how long the pile of damp, stinking, festering rubbish had been in the bottom of that panel, but it really was nasty and I think had vastly accelerated the rust in that area. I can't easily get pictures of how bad that bit is today, but will do so tomorrow when the outer panel has been removed.

Finding all the spot welds was fun, here's a bit more action from the special drill bit. ;)
http://img391.imageshack.us/img391/1848/gte5117hv.jpg

I thought about this for a few minutes, because I wanted to be as sure as I can that the inner arch goes into the right position when it goes back together, so I nibbled across the top of the arch and plan to leave the outer in position just for the time being. It'll most likely get removed tomorrow.
http://img391.imageshack.us/img391/5741/gte5137fj.jpg

Some more screwdriver action from the outside of that lower rear quarter - when I took the bumper off it all looked fairly OK, but soon turned to swiss cheese with a few well placed prods.
http://img391.imageshack.us/img391/1314/gte5167yp.jpg

So it didn't look too bad to begin with, from the inside the arch didn't look at all bad and I was pretty shocked that it all came to bits the way it did, particularly at the back. I could have just fillered the arch across the top and that would have been dead easy compared to what I've let myself in for.

Tomorrow is going to be a difficult, painful and frustrating day, Anyone that's been noticing what I've done on this today will see that I've deliberately not done the fundamental cuts yet, that's going to have to be right or it'll look crap. Definately not looking forward to it.

I'll post some pics for Graham of the new panel in a moment...

Ian.

Ian T
10-06-2006, 12:59 AM
Just for Graham, dome more pics of the new quarter panel. Looking critically at it, I only got the other side subtly wrong, my main annoyance is that I pushed the panel in as I welded it thinking that would help hide the welds with filler, didn't need to.

For me, this is the money shot:
http://img391.imageshack.us/img391/8043/gte5040qn.jpg
Mainly because it shows the line along the top of the arch and how the flare comes out to meet it.

Here's the side on shot I think you asked for:
http://img391.imageshack.us/img391/395/gte5064xe.jpg

For reference, the crease along the top of the arch runs forward and starts the turn down but finishes pointing at the bottom of the swage line, where it just blends into the angle of the lower part of the panel. Much simpler than it looks, plus on a GTE with the side strips, you'll never see that bit with all the mouldings fitted. ;)

Main bit to get right is the bit along the top, keeping it straight across the arch into the rear corner.

Have fun with the sanding block. ;)

Ian.

Ian T
11-06-2006, 12:07 AM
Right, busy day today... and there are some more pictures.

Drilled the spot welds out of the B pillar, plus the four that hold the door locking pin to the outer skin, then ran the angle grinder across the B pillar, a little way below where the new panel will line up:
http://img391.imageshack.us/img391/3357/gte5181cr.jpg

Angle grinder again across the C pillar, on the same basis:
http://img391.imageshack.us/img391/1981/gte5199qc.jpg

Twice more with the grinder, first down the C pillar between my other cut and the light aperture, then across between the boot opening and the light aperture - just to make it easier to get the bits out:
http://img391.imageshack.us/img391/8061/gte5209od.jpg

Caption time...
Me: "We are doing a 5 door, aren't we?"
Mark: "Oh nooooooo, what have you done?"
http://img391.imageshack.us/img391/2756/gte5218fz.jpg

And from the other side:
http://img391.imageshack.us/img391/6597/gte5242vj.jpg

Panel removed now:
http://img391.imageshack.us/img391/4231/gte5277dr.jpg

Now down to business... cut out the rusty part of the strengthening plate and replace it:
http://img391.imageshack.us/img391/8058/gte5285og.jpg

New metal - without this section the surrounding metal is pretty floppy, even though the bottom isn't yet welded to the sill (not present) it's as rigid as you like, so well worth doing:
http://img391.imageshack.us/img391/6271/gte5342tk.jpg

And now, how it looks when it got dark and I sacked it for the day.
http://img391.imageshack.us/img391/4816/gte5380ag.jpg

I've deliberately not said much about the new panel fit - I think a lot of my frustration today results from my inexperience. There's quite a lot left to do befor the new panel goes in finally, but to me the B pillar isn't a good match in shape, plus the helpful joggling that was there obviously wasn't that helpful because there's no way the whole panel can go behind the existing one. Also I hadn't fully appreciated how darn difficult it was going to be to get the C pillar to line up, both at the rear window and around into the boot opening. All in all a bit of a pain!

Still, I can't filler it now, so I'll have to carry on.

Good news though, and I'll share it as anyone else that's got a SIP MIG welder might have the same problem. Mine ever since new would feed, then slip, feed, then slip, feed, then slip. After more slipping than feeding today I finally decided to do something about it. Looking at the top roller that bears down on the wire as it passes over the driven roller, the top roller was at an angle and so leaned onto the back of the drive roller, not the wire. To prove the theory, I leaned down on the top roller to straighten its alignment and pressed the trigger... smooth feed. I fixed it with a really simple strip of spare steel plate, as shown below, just to tie the top and bottom roller axles together so that the top tensioner does it's job properly. Anyway, as a picture says it all better, here's a picture...
http://img391.imageshack.us/img391/4001/gte5330hl.jpg

And that's enough for today.

Tomorrow the plan is to sort the lower rear quarter out properly, by cutting out the rusty plate and replacing it with new, hopefully that will be fairly straightforward and now the welder is in better shape I'll find it easier to weld up than the other side.

Then the plan is to offer up the outer skin, try to get it aligned properly and have a go at fitting the inner arch repair panel, which is such a good fit it might as well have been driven over... both sides. With the skin clamped in place I should be able to do something more meaningful with the repair panel and cut it down to match the good metal that's left in the inner arch and joggle away, tack in place and weld up properly.

There will be a lot of fiddling with the outer panel though, to try to get the best compromise of fit.

Ian.

untouchable
11-06-2006, 09:47 AM
jeeeeeeezus Ian, you are a brave man doing all that yourself!


Good luck for todays session, if it gets stressy, walk away for ten mins, then go back to it and see what its like then (my trick, else i would end up kicking something lol)

Ian T
11-06-2006, 10:15 AM
Thanks for the comments Mel, I'm not sure if I'm brave or stupid yet...

As I said to Mark, it's easy to unbolt all the good bits I've put on it so far and put them on a better shell if I mess it up beyond salvation. Hopefully it won't come to that though.

I'll try your tip out later. :)

Ian.

_Steven_
11-06-2006, 10:22 AM
It's the best way in the long run!..

When you fit the new panel, use a piece of the old, to in effect make your own 'jogging' to sit behind the car and and new panel, so they both overlap the piece behind..

It'll make welding up the joints much easier... :)

Ian T
11-06-2006, 10:29 AM
Cheers Steve,

Might be too late to do the B pillar that way as I've already cut it to use the joggle that Hadrian provided, but that one looks lovely! I'd be very happy with that!

Ian.

Ian T
12-06-2006, 12:53 AM
A little bit of progress today, some pics on the camera but nothing really worth posting up.

I've cut out the rust from the lower rear quarter and made a new inner wing out of spare 1mm plate, also added an angle to attach it to the rear panel, as the mating flange had gone rusty and also had to be cut out. That's all nice and solid now.

Next job was to start looking at the inner arch repair panel to see what I can afford to cut off it - removing part of its depth makes it more flexible and so will help me to make it fit the outer panel. So far I've got rid of almost 2" at the top, tapering down to almost nothiong at the front and back, but it fits more willingly behind the outer panel.

The bit I've been struggling with the most today is the outer panel, which isn't dimensionally as accurate as it could have been. Don't get me wrong, I couldn't have made a panel like that any better, but it really is a pain to try to fit it and clamp it in position so it all lines up everywhere. It seems that while the panel itself is really flexible, I've got some choices about where to fit it and some look better than others in terms of general accuracy, but overall have flaws.

For example, clamp it in place with the front all aligned to the door, with the locking pin fitted and that area held securely, the back end can go up or down by about 9mm. At the top of that range, the rear quarter moulding behind the window looks fairly good for size, but the swage lines on the C Pillar don't line up terribly well, plus the lower swage line seems to angle up a bit at the back, rather than staying flat.

Flex the back end down to the bottom of that range and the swage line looks great, the swage lines in the C pillar look better, but the triangular moulding recess looks too tall and I would expect the window aperture is also too deep.

Aaaaargh!!!

Anyone had any experience of Hadrian quarter panels? Their other stuff seems to be a good fit, so I'm not convinced I should be blaming the panel.

Also, a byproduct of fixing the welder is that it consumes more welding wire than it used to, and makes better welds - that means a trip to a different Halfords tomorrow if I get time to get some more wire. I'm very tempted to write to SIP and send them a pic of the mod, as it seems I'm not alone in having feed problems with their welders.

Ian.

Gteman
12-06-2006, 07:57 PM
The fit of non Oe parts was my biggest worry not being greatly experienced fitting them. A bodyworker would twist a bit here and push a bit there to get a good fit but it takes experience. £65 is a good price compared to Vauxhall's £160 ish(I think). I will buy a Hadrians one if you can get it to fit good LOL tho a Vauxhall panel might be on the list if your's is a real pain to fit.

Ps I hope to get a year or two out of the arch repair section before any quarters are going to get fitted. I might buy them while they are still available and store them.

Ian T
12-06-2006, 08:08 PM
Yep, that's a very sensible option.

I'll have a decent stab with this one and will be bending and tweaking as much as I dare to get it to fit, don't worry. I share your inexperience though!

On the face of it the panel looks like it's accurate, it just doesn't match the car too well. I've taken Mel's advice a couple of times and walked away, giving me time to think up new ways of checking what I'm doing is valid, so it's all good really. Provided I do get it monumentally wrong and end up buying a white shell (which I'd prefer anyway!) to repeat the project on.

I'll get there... I hope!

Ian.

Ian T
13-06-2006, 12:03 AM
OK, quite a bit of time, quietly spent looking, measuring, tweaking and fiddling tonight.

The short story is that I'm a bit happier now, the measuring bit paid off and I reckon it will go together acceptably.

I've got a few photos, which show one of the trial fits towards the end of the evening, I've also cut some more of the original inner wheel arch out to make the repair panel easier to weld in, but may take yet more out before I finally weld the outer panel into place.

Here are the pics...

I've tidied up the cut in the sill ahead of the B Pillar and cut down the new panel to match. I may yet take another mm or so out of that to allow the sill area to move forward slightly and even the door shut up. The second piece of metal inside it will be an overlap section, which will help share the stress of a butt weld in that area.
http://img391.imageshack.us/img391/6167/gte5604ei.jpg

Here's a pic looking along the swage line from the back - this is probably the best telltale on the car of whether the panel lines up or not.
http://img391.imageshack.us/img391/9264/gte5625kf.jpg

And looking the other way...
http://img391.imageshack.us/img391/824/gte5676lz.jpg

Here's one of the plating up of the inner lower rear quarter, finally getting that rusty bit sorted:
http://img391.imageshack.us/img391/2418/gte5412qs.jpg

That's all for today.

Ian.

Ian T
18-06-2006, 01:02 AM
A pretty useful day today, the outer skin is now welded in.

I spent the earlier part of the day adjusting the fit of the lower front corner at the sill, which paid dividends in straightening the fit of the whole panel. In the end I decided to deliberately cut the new panel slightly short to make best use of the overlap section and ensure a good weld. This also gave much more scope for moving the panel around without it ending up overlapping anything, as that puts it straight out of alignment.

That brought the rear end of the swage line down to match the line of the door exactly, whilst moving the panel gap closer at the bottom of the door, which means it's now nice and even. The other obvious improvement was that the rear end came into alignment almost by itself, so my earlier comments were right, the poor fit of the panel had more to do with my own inexperience than its shape. It's still inaccurate in some places, but this can be sorted.

On to the pics...

Overlap section now welded in with four spot welds
http://img391.imageshack.us/img391/3263/gte5740qp.jpg

When welding, you really can't have too many pairs of Mole grips...
http://img391.imageshack.us/img391/5310/gte5750gr.jpg

Inner arch spot welded to outer arch, but not yet welded along the inner arch skin
http://img391.imageshack.us/img391/9255/gte5786za.jpg

B pillar, welded, will be ground back flat tomorrow and inspected.
http://img391.imageshack.us/img391/8575/gte5819gt.jpg

C pillar, same.
http://img391.imageshack.us/img391/328/gte5839yj.jpg

Lower rear corner, seam welded here as it was easier.
http://img391.imageshack.us/img391/7862/gte5845yf.jpg

Sill, at the base of the B pillar.
http://img391.imageshack.us/img391/301/gte5861pu.jpg

A quick look along that telltale swage line...
http://img391.imageshack.us/img391/6865/gte5898in.jpg

And the other one...
http://img391.imageshack.us/img391/5272/gte5921bu.jpg

So I think that's enough for today, tomorrow I will get the inner arch seam welded together and the patch stitched in at the back corner. Then I'm going to seam weld the sill rail as it's spotted for now, then grind out the window aperture to the correct size.

Hopefully I'll get all the welds ground back and should be in a fairly good position to start filler work and seam sealing.

Ian.

GazJevs84
18-06-2006, 02:58 AM
some excellent work there mate i respect you alot for taking all this on by yourself and i am excited to see the finished product.

Gteman
18-06-2006, 12:24 PM
PMSL at the mole grips, I tried counting them and I think you have as many as me in the garage.

It is starting to look really good m8 can't wait to see the finished result.

Graham

Ian T
18-06-2006, 12:42 PM
PMSL at the mole grips, I tried counting them and I think you have as many as me in the garage.


LOL... there are about three pairs missing somewhere, should have another pair of black ones, a half broken small pair and another medium pair.

I went down to Homebase and bought two sets (or 3 pairs) of their cheap 'value' ones, something like &#163;8.99 each set. Can't go wrong! ;)

Off back outside to do some more welding...

Ian.

Ian T
19-06-2006, 09:11 AM
A bit more progress yesterday.

Inner arch is all seam welded together and the patch at the back of it is now fitted as well. Most of the day was spent alternating between welding and grinding (to give the neighbours a break).

I also cut the arch lip back quite a bit to allow wider tyres without rubbing, so hopefully that will save any problems later, although I'm more likely to use smaller tyres next time anyway.

One of the more satisfying jobs was to trim the inside of the window aperture back to size - the new panel has a longer flange than is needed. Combination of the new angle grinder (thanks Mark) and a hand file.

Some pictures...

B pillar, partially ground back, pretty much ready for a skim of filler.
http://img146.imageshack.us/img146/3011/gte5950te.jpg

Base of the B pillar at the sill, same.
http://img146.imageshack.us/img146/9812/gte6151hk.jpg

C pillar, same. Look carefully and you'll see it's slightly dished in at the seam weld, this should help with filler later I hope.
http://img146.imageshack.us/img146/695/gte6109xe.jpg

And the whole quarter...
http://img146.imageshack.us/img146/198/gte6140wa.jpg

Moving to the arch, looking from the inside can be a good way of seeing where the welds didn't quite get enough heat into them.
http://img146.imageshack.us/img146/5376/gte5960rk.jpg

And from the other side...
http://img146.imageshack.us/img146/4215/gte6036wf.jpg

Across the top, and yes it was a bit of a pain to weld here!
http://img146.imageshack.us/img146/7906/gte6075gp.jpg

And now the front.
http://img146.imageshack.us/img146/2784/gte6090tk.jpg

Rear arch spot welds ground down eady for some filler.
http://img146.imageshack.us/img146/3321/gte6297sx.jpg

Rear quarterlight window aperture trimmed and welds ground down.
http://img146.imageshack.us/img146/8682/gte6175ro.jpg

That's all for now.

Today I'll grind down the remaining welds and start on the filler across the welds, also begin the rustproofing of the inner arch (seam sealer and stone chip).

Reckon it'll be ready for Retro?

Ian.

Ian T
21-06-2006, 03:53 PM
OK, very quick update while I'm letting the latest bit of filler go off.

Had Monday off to help my family look for a new car, then yesterday I spent most of the day adding filler to cover the welds in the C pillar.

As it was due to rain overnight, I thought I'd sqirt some gash paint onto the bare metal areas to protect it, but made a massive mistake. The only paint I could find that looked useful was some of that Hammerite No1 Rust Beater from Halfords. The panels are not rusty, of course, but the paint took well and this morning I went to gently sand it off. No chance. That stuff is like a thin layer of rubber and just instantly clogs sandpaper, even wet.

So this morning I wasted about an hour and a half getting rid of the protective layer. Won't be doing that again.

Anyway, filler. The C pillar is probably the most critical bit of the whole job because it's the most exposed, so I thought I'd put all of my keenness into it. A few iterations of filler later it was starting to take shape, as below:
http://img146.imageshack.us/img146/276/gte6405ah.jpg
http://img146.imageshack.us/img146/1441/gte6392yu.jpg
http://img146.imageshack.us/img146/9063/gte6427ea.jpg

How I've just left it is like this... with a new layer of filler on top to address the low area at the base of the curve in the swage line. The panel is dished in a bit here to allow this all to happen without welds poking through, or excessive (read weakening) grinding going on.
http://img146.imageshack.us/img146/1378/gte6517jv.jpg

I also put some filler onto the top and bottom of the B pillar, but that's had much less time spent on it and is still rather immature in finish. Needs more filler and more time.
http://img146.imageshack.us/img146/9513/gte6443iw.jpg
http://img146.imageshack.us/img146/6224/gte6457on.jpg

That'll do for now, more later I guess.

Ian.

Orange Peel
21-06-2006, 05:09 PM
Good work mate :)

NIce to see your progress :)

Valver
21-06-2006, 05:26 PM
Making some good progress there Ian...

Takes me back!! :)

Ian T
21-06-2006, 06:41 PM
Cheers guys...

I'm agreed with GTEman though, filler takes ages. Thought it would be easier doing the quarter, but it's still taking a lot of effort. I'm thinking it's me being slow. ;)

Ian.

Tony25
21-06-2006, 08:29 PM
Top job, if you was doing an arch again would you use the repair patch or the quarter again?? Going to do both arches on mine this year, as i think two pack paint is going to be a thing of the passed soon, water based paint only :duh:

Tony25
21-06-2006, 09:02 PM
Ian didn't know you was breaking it!!!


http://cgi.ebay.co.uk/Mk2-astra-gte-breaking-not-16v-c20xe-gsi-sri_W0QQitemZ4652360872QQcategoryZ10404QQrdZ1QQcmd ZViewItem

Ian T
21-06-2006, 09:50 PM
Ian didn't know you was breaking it!!!


http://cgi.ebay.co.uk/Mk2-astra-gte-breaking-not-16v-c20xe-gsi-sri_W0QQitemZ4652360872QQcategoryZ10404QQrdZ1QQcmd ZViewItem

That is my car, photo taken in Devon when I went to see it.

Needless to say it's just image theft, all breakages have been rectified. ;)

Not sure which I'd do next time, but think it would be the quarter, simply because most of the shaping is already done, plus you get the arch to inner arch fit without too much effort.

Ian.

untouchable
22-06-2006, 10:17 AM
such an interesting thread Ian, your progress is coming along brilliantly :D

Ian T
22-06-2006, 10:32 AM
Thanks Mel. :)

I'm starting to cross things off my Retro list though, so I'm concentrating on getting it ready for the road, rather than looking lovely at the moment. Don't want to compromise on the finish, but can leave things like cutting the new paint back for a couple of weeks, which would do it good anyway.

The current aim is to prep and spray the quarter, NSF wing and OS door if possible, then to properly treat the inside of the wheel arch. I expect at some point today I'll put the rivet pins on that will eventually hold the skirt clips to the car, as I had the call from Vauxhall yesterday to say they'd arrived.

Better get to it I guess... ;)

Ian.

Dale
22-06-2006, 12:33 PM
its good to see your not rushing and i can't wait to see the next stages!! should be a great car soon

Ian T
22-06-2006, 01:11 PM
its good to see your not rushing...

Oh but I am...

Aaaaargh!

Trying not to cut corners tho!

Ian.

Ian T
26-06-2006, 01:40 AM
Right, a really mad weekend sees the car now in paint.

I'll condense this little lot or it'll take me all night to type in!

The filler work got finished, with a few more iterations on the C pillar. The shape of the curved swage line was actually a bit easier than I thought it would be to put in, as the panel is only about 2 or 3mm behind the filler. Even so I didn't see it through the filler once I was happy with the final result. The basic process was to add filler over the whole area, then while it was still pliable, run the spatula over it in the approximate shape wanted around the curve, staying inside the curve, leaving any sharp lumps of filler as they were. As the filler started to harden and became rubbery, a sharp knife was used to trim the raised bits of filler and generally tidy it up a bit - not important really, but saves more sanding later!

Then, once the filler had set properly and was no longer tacky to the touch, some basic shaping with a block and P180 sandpaper brought the filler almost level with the surrounding metal, both inside the curve and down the C pillar itself. The interesting bit was then using a large sharp flat bladed screwdriver as a sculpting tool to trim along the swage line and clean it up from the inside. Difficult to explain, but made sense at the time. With the basic shape there, rolled up sandpaper (P240) was used to form the lowered round recess above the line, which blends out in the corner.

Lots of sanding, then filling of filler bubbles with brush on primer gave this:
http://img146.imageshack.us/img146/192/gte658small4rw.jpg

Similar work on the other joins finally got them to a reasonable standard, although I still think I could have done better - mental note to self: don't rush next time!

Here's the sill:
http://img146.imageshack.us/img146/4614/gte6617sj.jpg

And the top B pillar join:
http://img146.imageshack.us/img146/4899/gte6594tu.jpg

Next the spot welds in the arch got the same attention, this time needing a very minimal amount of filler thanks to some uncharacteristically accurate grinding. ;)
http://img146.imageshack.us/img146/9412/gte6640gw.jpg

You can quote me: "This isn't going to rust again!" Seam sealer went into all the lower rear quarter seams (I've got cuts in my arms to prove it!)

Seam sealer then onto the seams around the light aperture:
http://img146.imageshack.us/img146/8265/gte6708sz.jpg

And inside the wheel arch over the seam welds:
http://img146.imageshack.us/img146/604/gte6749di.jpg

And the piece de resistance as far as I was concerned... some Bodyline stonechip on the INSIDE of the quarter... I used this because it dries to a flexible high build finish and got into the seams well. Where I couldn't get to (over the top of the arch) on the inside will be sealed later with waxoyl and schutz.
http://img146.imageshack.us/img146/5505/gte6776rn.jpg

Next the same inside the wheelarch - that stuff covers really well! I put plenty on, as it looks a bit more like the OE stuff that way. Can't see any stones making it through to the metal there. I also lightly sprayed the lip of the wheel arch to protect it later when the skirts get refitted. The outside of the lower quarter got done as well, as this will certainly see some stones.
http://img146.imageshack.us/img146/6486/gte6787rt.jpg

And the back of the arch...
http://img146.imageshack.us/img146/3209/gte684small5dg.jpg

Thanks Mark! (birthday present)...
http://img146.imageshack.us/img146/8706/gte688small5na.jpg


Next was the interesting (not) job of reassembling enough for it to look legal on the road down to the lock up garage, where I do my spray work - can't really do it at home due to compessor noise, nasty smells and the number of flies that love wet paint.

That meant the bumper had to go back on, rear light, quarter trim and quarter window. That represented the absolute minimum I thought would get me there without official molestation.

Anyway, once at the garage, the obvious strip down started, this time removing both bumpers, NSF wing, NS door and scuttle panel.

Stripped again...
http://img146.imageshack.us/img146/3281/gte6937ej.jpg

Garage had to be prepared as well, as it was still full of leftover engine bits from the V6 transplant... You'll see the door safely wrapped up at the back.
http://img146.imageshack.us/img146/6453/gte6947vx.jpg

Here's the car in the garage after a coat of etch primer went onto the areas of bare metal. I'll say one thing about that primer, it went on really really well - it was some UPOL etch primer (white) that was really easy to rub down later and didn't react in any way with the other paint.


And especially for those that were interested before, here are the rivets that Vauxhall sell for fitting to new panels, to retain the trim clips:
http://img146.imageshack.us/img146/7461/gte6991rd.jpg

Simple to drill and pop rivet them into the panel, I can't see why anyone bothers with self tappers! These are only 36p each:
http://img146.imageshack.us/img146/9321/gte7026rk.jpg

Next the holes were drilled for the expanding plastic rivets in the wheel arch - I did these simply by holding the skirt in position and marking them:
http://img146.imageshack.us/img146/1263/gte7044gs.jpg

And the rivets underneath, followed by another coat of etch primer to seal the rivets to the body, and to protect the drill holes in the arch:
http://img146.imageshack.us/img146/3519/gte7075mo.jpg

More in a mo...

Ian.

Ian T
26-06-2006, 02:17 AM
And with the main preparation of the quarter pretty much finished, todays job was to get on with the painting properly. Bad weather is forecast for some points during the week, so I wanted to get it done before the air turned damp and humid.

First, some prep around the A pillar, which I had previously blathered waxoyl into the hinge slots to seal them. This was cleaned out (with thinners!) and then seam sealer applied to do a proper job.

Next was the bit I always find the most tedious - masking up. Fortunately I spotted Robin using this sort of masking sheet on Dan Gliballs car and bought myself a roll - saves loads of time farting about with newspaper!
http://img146.imageshack.us/img146/4508/gte7337jb.jpg

Some ordinary filler primer on next to get an even base coat, which ought to help the colour consistency later when the colour coat goes on.
http://img146.imageshack.us/img146/4903/gte7350so.jpg

Obviously the whole lot was then rubbed back flat using P500 wet and dry paper (wet) and the panels meticulously cleaned before the first colour coat, which went on OK, except for a small patch on the top of the roof, where the paint seemed to retreat a little. Aaargh! Anyway, I stopped painting at that point and rubbed it back with P500, cleaned up again and continued spraying, seemingly without detriment to the final finish, but that will remain to be seen later in daylight.

The lacquer coat was next, as per instructions to wait only long enough for the colour coat to flash off before spraying. This went on better and got closely followed by a second, heavier coat.

Some assorted pictures, although as per usual they completely fail to capture the excellence of the job. ;) Actually I'd be lying if I said it was perfect! It's got an Ian T trademark lacquer drip smack in the middle of the quarter panel, where I was spraying along the roof line and the top seal leaked. That'll rub down and compound out later I expect. Still got the one in the other side from the same spray gun!
http://img146.imageshack.us/img146/669/gte7542iw.jpg
http://img146.imageshack.us/img146/9942/gte7553ok.jpg
http://img146.imageshack.us/img146/2899/gte7580ll.jpg
http://img146.imageshack.us/img146/9489/gte7596ez.jpg

In parallel with all this, I had prepped and primed the replacement front wing, and I got that into some paint as well. It came off a scrap silk violet cabby at NSEC (Stock) but looks to be an original Vauxhall wing (stamped with a number) and was remarkably unrusty.
http://img146.imageshack.us/img146/7830/gte7513pv.jpg
http://img146.imageshack.us/img146/6652/gte7568eg.jpg

That last picture is of the wing stored inside my new shed. I was given a Rover 400 (1.6) this week following apparent clutch failure, but have since welded the slave cylinder mounting bracket up where it had split and it drives again now. Don't really know what to do with it now. Sell it I guess. I'll MOT it and bung it on eBay I expect.

Anyway, back to the GTE, it's been unmasked and is now waiting for some bits to be refitted, rustproofing of the wheel arch and general road testing before Retro. Back on track, but sadly that means the doors won't be painted before the show, so it'll still look like a bitza. Never mind. :)

Ian.

Kris
26-06-2006, 02:24 AM
Your hauling now Ian i hope to have a right good nosey at Retro :applause:

Gteman
26-06-2006, 09:42 PM
I hang my head in shame :(

Thats lot of work there crammed in to a short time.

I take my hat off to you :applause:

Can't wait to see her in the flesh

_Steven_
26-06-2006, 09:55 PM
Looking good :)

richie00boy
26-06-2006, 10:22 PM
Nice one Ian and thanks for showing us the rivets - sill work will be on my job list in the future I'm sure.

Ian T
26-06-2006, 11:59 PM
Thanks guys, for the nice comments, it's good to get some feedback, makes it more worthwhile if that makes sense. :)

Please remember it's no professional job and expect the doors not to match the car - I'm afraid there's just not enough time to paint them before Retro.


Anyway, tonight's update - I spent about 4 hours down at the garage, couldn't resist cutting the paint back a little to a shine. Amusingly the offside has never been polished since it was painted, so this has now overtaken it in progress.

I also cleaned up the Nexia window seal and bonded it in with black PU seam sealer, refitted the quarter trim and glass. The rear light was fiddly to refit straight but I've got it something like right. Next the boot seal went back in and the door seal, after which I retrieved the door loom connector and courtesy light switch wire, which I had pushed inside the A pillar while it was being painted.

Hopefully tomorrow I'll clean the inside out, spray waxoyl / schutz into the inner sills and then start refitting the interior parts, maybe even get the door refitted.

Ian.

Kris
27-06-2006, 12:04 AM
I hang my head in shame :(

Thats lot of work there crammed in to a short time.

I take my hat off to you :applause:

Can't wait to see her in the flesh


What happend mate ,your were motoring ahead then ,well nowt in yoiur thread ?

Ian T
28-06-2006, 12:13 AM
OK, another few hours this evening before it went dark.

Got the inside of the quarter panel waxoyled thoroughly and refitted the plastic panels and rest of the interior. The NS door is back on and the front wing is fitted.

Also got the back bumper on, so there's some progress still being made. I'm debating having a go at (at least) one of the doors before the show, but that might be pushing my luck.

All being well, the urgent job list is:

Replace flexible fuel lines and re-route.
Refit front bumper
Refit inner arch liners
Build RPM converter (my design works!) and fit behind instruments
Fit windscreen weatherstrip seal
Refit drivers door lock barrel (if I'm not spraying the door)
Fit passenger deadlock motor


Less important bits:

Flat back the new front wing paint and polish
Flat back and polish OSR quarter, and OSF wing
Fit new door protection mouldings
Fit stone protection mouldings (skirts)
Prepare and respray both doors (looking unlikely now!)
Prepare and paint plastic bumper mouldings (also unlikely)


So that's all I can remember for now, but it's definately getting there.

Ian.